One comic-related hobby that I always see examples of online, and think how cool it is, is the whole action figure customization thing. I'm not talking about the sculpting out of whole cloth thing like Jesse321 does (which is just phenomenal, but well beyond anything I could do) but rather taking an existing figure and modifying it to be a new character.
I've been thinking for a while how cool it would be to try to make some figures for some of the Legion World characters, but never really in any serious way. This past weekend, though, I was in a craft supply store with my wife and started looking at the acrylic paints and sculpting clay. I realized how easy it is to find all the things I would need, and how reasonably priced it all is and thought, You know what... I think I'll give this a go!"
I am not really a sculptor, but what I am is an insane person who loves obsessing over details, so I think I can make a fair attempt at it. I'm going to start with just trying to make a single figure and, if it turns out nicely and I enjoy the process, I'll continue on with some more.
Since I don't really own that many action figures of my own (and the ones I do - Legionnaires - I ain't chopping up) I decided that I should probably use base figures that meet a few parameters:
- They should all be part of the same line. If I wind up liking this project and want to continue, I'd want them to all have the same scale and a similar look and feel.
- There should be a ton of different figures available, and have both human and aliens represented.
- They should be easily obtainable, and reasonably priced.
- They should have limited articulation (I'm sure Spider-man with 84 points of articulation is cool and all, but I think that would be a nightmare to try to take apart)
So with all that in mind, I decided probably the easiest and cheapest group of figures to work with would be Star Wars figures from Hasbro. I hopped on eBay last night and bought my first victim. Let's see if you can guess which Legion Worlder I plan on making first :
I should be getting the figure in about a week, and I'll post pictures throughout the process. I'm really excited; I think this will be a really cool challenge.
[ December 27, 2011, 07:51 AM: Message edited by: Exnihil ]
Posted by Cobalt Kid on :
This is going to be so cool! You're kind of like a mad genius, Ex.
Bring on Lard Lad!
Posted by Dev - Em on :
Let me know which other ones you are looking for...I may have some to part with.
Posted by Exnihil on :
"Lo, There Shall Come a Lard"
Part 1 - Breakdowns
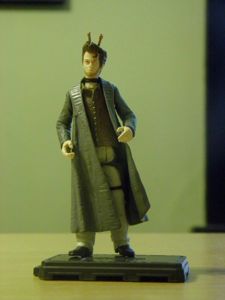
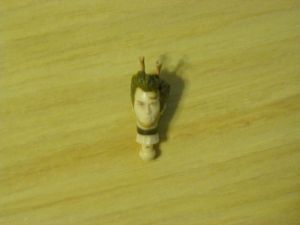
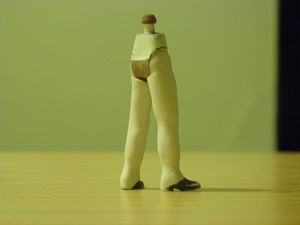
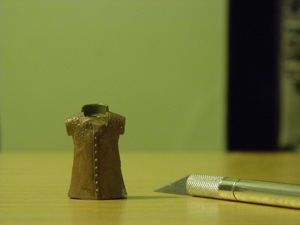
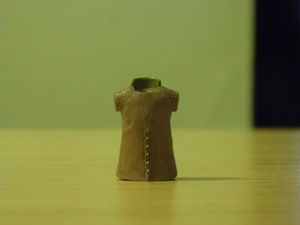
So... guess who showed up at the Nihil house tonight:
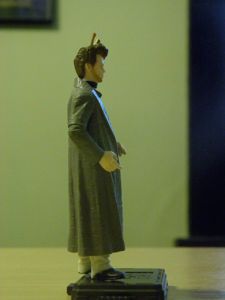
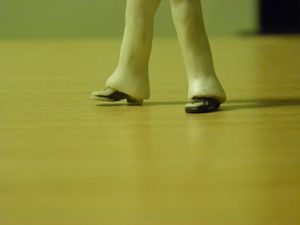
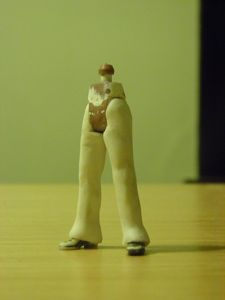
I chose this particular figure for my first foray into customization, because the resemblance was already pretty close to the target that I want to achieve:
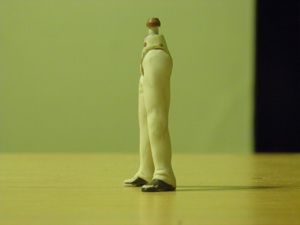
Even apart from the overall body shape, there are several key details that I think will help me out as a beginner.
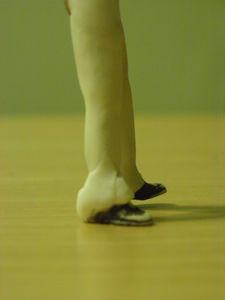
The gloves are pretty much fait accompli, as is the general boot height (though I need to reshape them a little). Though the torso needs a lot of work, there are at least general lines that I can take advantage of for building out the midriff and chest. The above pic doesn't show it well, but there is also a fantastic line on the face to guide me with the beard.
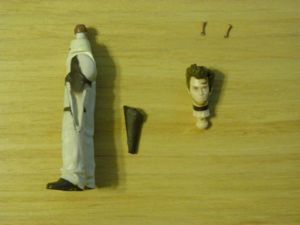
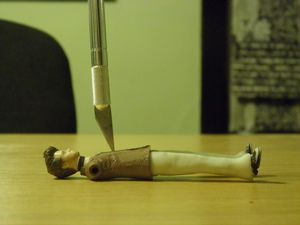
So, first things first, off to the kitchen for a little disassembly:
Pliers? Check.
Towel? Check.
Boiling water? Check.
Future Lardy? Chec... wait... what...? You're not putting me in... ahhh! Glug... glug...:
This is to soften up the plastic to remove the head and limbs without breaking them. It's actually very easy.
Convincing Pippin that I'm not making dinner? A little harder:
Remove the figure after about one minute in the water and, working very fast so the plastic doesn't harden:
You just... POP:
Repeat for each of the arms and legs and soon you've got him right where you want him:
The tutorial I'm using says you can also pry apart the torso, but I think... for my first one... it might be easier for me to visualize what I want if I leave it together.
Up next: Slice it up, grind it, sand it down... oh, no!
Posted by Cobalt Kid on :
You know, you are one cool mofo, my friend.
Posted by MLLASH classic on :
uuuh... I am TOTES into this "breakdown of the process" thing. TOTES.
Posted by Power Boy on :
OH BOY, I can't wait to see the final product !
... and Pippin's further contributions.
Posted by Exnihil on :
"Lo, There Shall Come a Lard"
Part 2: Enter Sandman
So... I've got the guy apart, now what?
Well, before I start building up the bits that I'm missing, I need to take away the bits I don't want.
Since this is my first time trying this, I wanted to start with the easiest of the limbs - the left arm:
The original figure was dressed in a jumpsuit, but I need to somehow make it look more form fitting, like spandex. The main thing I need to get rid of is that pocket, and then I can work on smaller things like the folds.
But first things first, before I start sanding away, I actually have something super-easy I can do... that glove notch that Lardy has on the inside:
Like I said, easy. Two quick slices with an X-acto knife, then just scoop it out. Now... more difficult, that pocket:
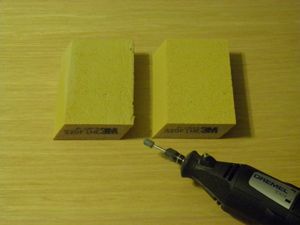
For that I used a dremel with a grinding bit. At first I was all gentle with it, afraid I'd take off too much, but once I got the feel for working at such a small scale, I was more confident and just ground that sucker down, trying to get it as near as possible to the level of the upper arm.
Next up, the longest part... the sanding:
I used two different types of sanding approaches. on the right is just sandpaper (100 grit) which I used to actually get rid of the unwanted ridges and stuff, and on the left is a sanding pad which I used to blend to give it a smoother appearance.
Sanding takes forever. At first I was worried that I would kick up all kinds of dust and plastic fumes but - while that may occur with prolonged dremeling - this is soooooo slow going that just sitting with a towel on my lap is more than enough protection.
So, as to not neglect the family, I moved operations to the living room and just idly sanded for a couple hours while watching TV.
Pippin was very interested:
Probably because he thought it was a treat.
In the end though, I got the look I was going for: a softer, more "fleshy" arm that looks as though it's in skin tight fabric as opposed to something more "blousey":
I can probably get a little smoother around the crook of the elbow, but, hey, not too shabby for a first try.
As all the limbs are made from the same type of plastic, I won't post pics for each one. I'll just put up the next update when I have all four done and move on to the torso, which is a harder grade of plastic.
By the way, where's the real Lardy? I feel like he's either going to love that I'm doing this... or want to kill me.
[ December 30, 2011, 08:58 PM: Message edited by: Exnihil ]
Posted by ActorLad on :
Neat project! I've always wanted to get into action figure customization but have really never had the time. Keep us posted on your progress!
Posted by Exnihil on :
I know I said last night that I wasn't going to post another update until I was done with the limbs, but... eh
You'll have to give me the benefit of the doubt... I just realized that I just spent the last three hours basically rubbing the pants off a tiny fat man... going from something like this:
to this:
I'm really learning a lot about myself. Posted by Dev - Em on :
Amazing stuff Ex, I have done a few things here and there with customizing, but this is much more complex than what I did.
Posted by Lard Lad on :
Well, it's too bad the poor fucker will never be as handsome as the real thing!
That's Porkins from Episode IV, isn't it? Never realized they made a fig of him! Must...have...figure!
Seriously, I'm a HUGE Star Wars nut and find it extremely cool that you're turning a SW fig into Lard Lad! I have a pretty fair collection of figs myself, many of them MOC from the time they started making new lines of them around the time the special editions were released. And, of course, I have many, many play-worn classic figs from my misspent youth still.
Can't wait to see how he turns out and to continue seeing the process! (Me, I'd never have the patience to do all that, but I sure admire your work!)
Posted by Dev - Em on :
You want the Porkins fig Lardy...PM me your address.
Posted by Lard Lad on :
Nah, it's okay, Dev--just having SW fig mania flashbacks! I'm recovering....really..... Posted by Dev - Em on :
I'll find a way... Posted by Cobalt Kid on :
Just don't ask what happened to his old Leia figure.
Posted by Eryk Davis Ester on :
quote:Originally posted by Lard Lad: Nah, it's okay, Dev--just having SW fig mania flashbacks! I'm recovering....really.....
Just keep telling yourself "I can hold it..."
Posted by Exnihil on :
"Lo, There Shall Come a Lard"
Part 3: The Unkindest Cut
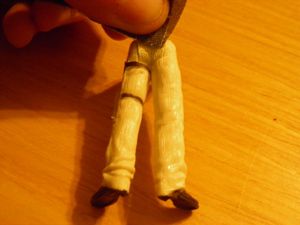
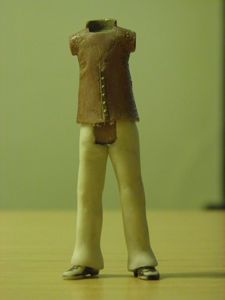
So I finished sanding down the limbs and wanted to make sure they weren't now too small for the body:
Nope... they look good.
Now it was time to tackle the torso. As I mentioned earlier, the torso is made out of a harder grade of plastic, so the grind and sand approach wasn't going to cut it.
I decided to try a different dremel bit, and try to just slowly shave off what I didn't want.
It worked like a charm.
I shaved the chest. I shaved the back. I shaved parts that no one should ever have to shave.
I took it very slowly to avoid going too deep (as the torso is hollow and I didn't want to accidentally create a hole). In the end, though, I was able to get it nice and smooth and am now left with a very nice base without all the detail from the original figure:
The only problem is that now, after taking off so much of plastic, Lardy looks a little less than... well... lardy.
Ah, ha! That's the next step, though.
It's time to bust out the clay and begin building up this now detail-less base to the goal design. I'm going to start with the boots to get a feel for working with clay, then, when I think I have it down, move on to the torso.
Up next: We can rebuild him!
Posted by MLLASH classic on :
This is so effin' cool...
Posted by Candlelight on :
Ex's ideas and execution are always marvelous (said with a strange Beverly Hills/Asian type accent.)
Lardy's a super good choice, too. That's a beautiful drawing of him, full of his usual p&v. Posted by Exnihil on :
"Lo, There Shall Come a Lard"
Part 4: Feet of Clay
OK, so I've got the guy all stripped down and sanded, and now it's time to begin building him back up to the shape I want him.
For this I'm going to use a clay called Sculpey:
The tutorial I'm using recommended this brand for beginners like myself, because it stays malleable until you cure it. That's good because, as I mentioned at the beginning, since I am decidedly not a sculptor, my approach is going to be "just keep at it until it looks right".
Sculpey comes in many different colors but, since I'm going to be painting the whole thing anyway, I just went with "Transparent," so I can mostly see through it to the lines I left to guide me (for example, the line on top of the boot in the pic above)
For tools, I lucked out that many years ago, Mrs. Nihil took a pottery class and still has her old tools that she's letting me use:
Of these, I actually wound up using only one thing - that metal pick looking thing. Basically, the scale I'm working at is so small, that anything else would just be too awkward (I could probably even just use a toothpick and it work work just as well).
To illustrate this point, tonight I wanted to do a test run (just working on one boot) so this is how much clay I used:
...and I wound up having some left over!
It's a bit of a slow process (for me at least) to both get the lines I want and keep it thin enough that I don't lose the detail already there. My hats off to those that do this all the time, as it required a very detailed eye and a steady hand.
After about an hour or so of etching in the top line and blending down the bottom part with a moist finger, I had something I was comfortable with:
Now it was time to cure it. The package said to bake it in the oven at 275 for 15 minutes for each 1/4 inch.
Well, I had nowhere near 1/4 inch worth of clay (more like a 1/2 millimeter... seriously) so I only kept it in about 3 minutes - watching the whole time, because I was worried about the paint on the boot melting (ergo the parchment paper).
It must have done the trick because, when I pulled it out, it was no longer malleable (I tested it by trying to poke it with the pick and it didn't leave a mark).
To make sure that I had a crisp line on top and that the bottom was blended well enough that there would be no visible drop off, I sanded it with a fine grade of sandpaper (220 grit):
... and, in the end, it wound up looking pretty spiffy and paint ready:
It will probably be a few days before I do another update because, although the other boot should now be a bit easier for me, I think the torso will probably take a bit of time.
Thanks for all the compliments so far!
I'm really enjoying this process and am already thinking, if this turns out well, who I want to try next. (Hint: I've been scouting out some Lobot and Mace Windu figures, looking for that perfect bald head. )
Posted by Dev - Em on :
w00t!
Posted by dedman on :
This is looking to be a fun project Ex, loving how you are showing us the process
Posted by Exnihil on :
Thanks, deddy... and this is actually a perfect opportunity for the "credit where credit is due" department to put in a word.
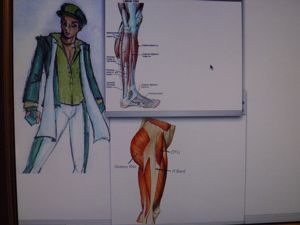
As I'm sure you know, but for the benefit of everyone who sees this, the drawing that I'm working from:
was actually drawn by dedman, himself, many moons ago, I assume based on the original drawing:
by Sketch Lad.
A quick update: As I mentioned before, the sculpting part is a little slow going for me, as this is the first time I'm ever trying to do it. I got the second boot finished, and started working on the torso. Hopefully by tomorrow, I'll have the torso in shape (or, rather, out of shape, as the case may be) and be ready to prime it.
[ January 04, 2012, 07:29 AM: Message edited by: Exnihil ]
Posted by Exnihil on :
OK... mini update, just because I'm really grooving on the way the top half of the torso is turning out.
I finally figured out what that looped clay tool is used for:
Clearly it's for sculpting man-boobs.
I was a little worried that with so much clay in the front now, that it would no longer stand up without tipping over.
What do you say, headless, only half-torso sculpted, future Lardy?
He says... well... nothing. He doesn't have a head. But he does still stand! Whew.
Bottom half tomorrow.
Posted by Exnihil on :
"Lo, There Shall Come a Lard"
Part 5: Belly of the Beast
Well, little by little, the sculpting is starting to take shape. When last we checked in, mini-Lardy had the beginnings of a torso, and I was going to try my hand at sculpting the trunks.
After trying it twice and realizing that I was making it too wide - it looked like he was wearing a diaper - it suddenly dawned on me that if I used the natural pivot of the legs, they would describe a nice arc for the trunks:
Good deal.
Now, you might notice a gap between the belly and the trunks... it's not a belt line; it's a space I intentionally left to build the rest of the belly.
This figure has an articulated torso so you can make it turn sideways. If I sculpted the torso as a continuous piece, I'd lose that, so instead - in keeping with dedman's drawing - I decided to build the belly downward so it would overhang the top line of the trunks.
Easier said than done. Because I couldn't use the figure itself a base for the clay (and still keep the waist articulation) I had to build it down from the clay I already had in place, one rung at a time, baking it in between each round:
Eventually, I got it to a nice girth that I'm satisfied with:
I still need to sand that last round, then I want to sculpt the shirt line. Slow going, I know... but we're getting there.
Posted by Candlelight on :
He's so amazingly kewl! Are you going to have a large bellybutton hole kind of show threw the 'shirt'? Sketch's drawing sort of hints at one. And I've never really seen someone with a large belly that the button didn't show through the shirt. That I remember anyway. Remember that comedian that came after John Candy? Chris Something? Anyway, I always kind of pictured Lardy like him. Thanks for the wonderful tutorial, too! Your kids must adore you.
[ January 08, 2012, 04:13 AM: Message edited by: Candlelight ]
Posted by Exnihil on :
Thanks for all the nice words, Shady! I don't know that this is so much a tutorial, though, as a "watch Ex stumble through a new process, learning how to do it as he goes along"-ial.
The comedian you're thinking of was Chris Farley, and you're dead right... he had the perfect shape (so to speak) as what I'm trying to get:
You probably can't see it in the pics, but there actually is a slight indentation around the belly-button. That's a cool thing about this clay - since I'm mostly just using a wet finger to smooth it out, if I do it a bit less, it actually has more of the appearance of a fleshy body and less a perfectly smooth surface.
Thanks for the kid comment, too... but... I don't have any. The only little one in my life is that little terrier on page one and, though he does adore me, he's miffed that he can't play with the new toy daddy's making. Posted by Exnihil on :
"Lo, There Shall Come a Lard"
Part 6: Crisis on Earth Prime
So, first things first... I finished the torso sculpt:
That shirt was way easier than I thought it would be. It was basically: add a thin line of clay, blend at the top but not the bottom, cut in a few lines on the side to make folds. It's funny that the easiest part of the sculpt is actually the part I think turned out the nicest.
So... got our guy all shaped, now it's time to prime him:
Since the thicker parts of the clay are white, and the original bits of paint still left are black, I decided to go with gray primer, so I could tell if I was getting full coverage. The tutorial I'm using said to make sure it was sandable primer... but since every can I looked at was sandable, I just went with a brand I've used for other things I've done in the past.
Obviously, I'm not going to use spraypaint inside, so I took future-Lardy out to my backyard:
The instructions said to use a fine even mist, going back and forth and overlapping layers.
Yeah, right.
This thing is like three and half inches tall... one pass and:
This primer dries to a handle-able tackiness in about 15 minutes or so, after which I bent the joints to hit the areas that weren't covered in the first pass:
Since it's still a little tacky to the touch, I've decided I want to let him dry fully overnight before sanding and hitting him with another coat.
The next image still has a few rough spots that need to be smoothed out, but you can really see him starting to come together:
Pretty nifty, eh?
Posted by Dev - Em on :
wow...
Posted by SharkLad on :
Very cool, Ex!
Posted by Candlelight on :
You're so funny. You make me laugh with your comments and details.
I'd love your next one to be Dev. He's bald in both realities!
Deddy is bald, though, too, isn't he?
I know, you could do them both at the same time, sort of a baldy assembly line. (Just an idle thought, s k if you ignore it.)
Sharky's kind of bald, too.
Posted by MLLASH classic on :
Absolutely fascinating!
Posted by Cobalt Kid on :
^ Yeah, I'm drawn in like watching a workshop television special. It's so cool to watch you hit each new step.
Posted by Exnihil on :
Thanks, guys! I'm glad you're having as fun watching the process as I am doing it.
This next chapter in the ongoing Lard Lad action figure saga, though, will painfully demonstrate exactly why I said this project is not a tutorial.
So, when last we left headless Lardy, he was all primed up and looking pretty spiffy:
I was just waiting for the tackiness to dry up so I could sand it.
So I waited.
And waited.
And waited.
Two and half days later, he was exactly the same consistency, nowhere near ready to sand. I tried using a hairdryer to hasten the drying process... but nothing.
What had I done wrong? Well... whenever I'm in need of sage advice, I consult a message board, so I started hopping around the action figure customization boards, and in short order, found out that I wasn't the first person to have this problem.
In typical message board fashion I got the answer I was looking for:
Well, it turns out that not all sandable primers are created equal, and the brand I used has a difficult time adhering to plastic. Quite a few sites recommended that they have had much a better experience using a vinyl touch up paint.
I probably cursed myself by calling that last chapter "Crisis on Earth Prime" but if reading comics has taught me anything it's that - when faced with a Crisis - it's best to respond with a partial reboot... so:
"Lo, There Shall Come a Lard"
Part 7: Crisis on Earth Prime 2 - FINAL CRISIS!
Well, DC has the Spectre to help out during their crises, but I had to rely on a different spirit:
I stripped off all of the offending primer as best I could, leaving Lardy a bit worse for wear:
and tried the priming again, this time with the recommended paint:
I would have preferred to stick with grey, but after calling around, could only find black.
But... what a difference!
It goes on super-thin, better maintaining the detail than the original primer. It dries - not to tackiness, but to fully dry - in like 15 minutes. And... I don't have to sand it!
That means that newly primed Dark Lardy:
is now ready to paint.
Whoo-hoo!
Posted by Candlelight on :
I'm sorry you had troubles, but the process made me . Especially the Prime comments and the picture of the mineral spirits!
Posted by Exnihil on :
Thanks, Shady. Yeah, the primer thing was a bit of a bummer (especially because I thought it looked so cool the first time) but, eh, live and learn.
I double checked the figure this morning, and noticed there was a little scuffing on his left arm, where it rubs against the belly, so I did a quick touch up before work but, overall he's looking good and I'll start painting him tonight.
Up until now I've focused on the body because I figured, since I was still getting the knack of this, I didn't want to experiment too much on the head, where little details would be more noticable. But now, since I have a little more confidence, I'll begin hatching a scheme on how best to do that. I've been debating whether or not I want to try to make his visor removable, because I think that would be a nice detail.
Posted by Exnihil on :
"Lo, There Shall Come a Lard"
Part 8: I Sing the Body Acrylic
So, I learned a couple of things about myself this past week:
1. Painting takes me a long time.
2. I find it very relaxing.
This step of the process requires so much focus on something so tiny, that I really just lose myself in the activity. I would get a section done and then look up and realize that four hours had just passed without even noticing it. Insane.
But, anyway, let's take a look at the process. First up... supplies:
I picked up a few bottles of acrylic paint at the craft store. These are super cheap, 59 cents apiece, so I got a couple shades of blue and yellow, along with a black and white to be able to mix to get what I was looking for. The tutorial I'm using said that I should use natural hair brushes, so I got a small variety pack.
Now, on to the mixing. In dedman's pic of Lardy, the majority of his costume is a sort of highlighted dark blue, but I was working on a black primer, so I figured I'd try to go a bit lighter, adding more white.
After I got a nice approximation of the color, I watered it down - both to ensure that it went on thin enough to keep the detail of the folds in his costume, and to try to keep the visible brushstrokes to a minimum. The final consistency was a little thicker than milk:
It took about three coats, and some spot touch ups to get a nice base:
After I got the base down, it was time to add some detail in the form of shadows and highlights. I mixed up both a darker and lighter version of my base color:
For the shadows, I used something called a wash, which is a very thin (2 parts water to one part paint) mixture of a darker shade of the base color. You basically just wet your brush with this wash and let it gently drip into the cracks and folds of the figure.
For the highlights, I did something called dry brushing, which means putting the tiniest bit of the lighter tint on the brush, then wiping it almost clean, and then very lightly almost "dusting" the figure on the natural light points.
This gave the figure much more definition, and really made me feel like I was making progress:
I then used the same process for all the yellow bits (which was a little bit harder, because now I had to keep a closer eye on my lines):
and then finally the white belly (which I washed by adding a couple drops of my original blue base to the white mixture):
An optional step that I decided to do at the end was to then sit in my living room admiring it and saying, "Sweetie... seriously... can you believe I actually made this?"
To which, apparently, the appropriate response is, "Yes, dear, your little doll body is very nice."
Next up: No talking, just head.
Posted by Candlelight on :
Yes, your little doll body IS very nice! Posted by SharkLad on :
Looking great!
Posted by cleome45 on :
I hope there's adequate ventilation in that workshop, though. I don't want to show up to this thread one morning and find out that Ex has been posting nothing all week but "Wahhhh! BUGS! Bugs are crawling all over meeeeeeeee!!"
Posted by Exnihil on :
"Lo, There Shall Come a Lard
Part 9: Bring Me the Head of Anthony Taylor!
Sorry this update took a while, but I really wanted to take my time with the head, because it is so tiny and easy to mess up.
As I mentioned a little while back, I wanted to make the mask that Lardy wears removable. Thankfully, this figure came with a ready made, snap on helmet:
The whole thing is just made out of that transparent orange that you see in the visor - just painted - so I was able to whittle it down with a dremel to the size of Lardy's mask, and still have it fit the head perfectly.
Additionally, leaving it on while I sculpted the hair and the beard gave me a nice guide as to how each should lie:
In the above sequence, you can see how I gradually added a little clay at a time (baking it in between each step), first getting the general shape, and then adding texture and detail (which I got by basically "combing" it with an X-acto knife.
In the final shot you can see that I primed the mask. I opted not to prime the head, because I had no illusions about being able to repaint the tiny eyes and not have them look ridiculous.
In any case, after I got the head fully shaped, I reattached it to the body and painted it:
I was soooo happy with how it turned out.
Here's a few glamour shots. Work it, Lardy:
aaaaaaaand... I'mmmmmmm..... spent.
Finally, I painted the mask, and invited my original model over to take a look at his plastic brother and see what he thought so far:
Thumbs up!
Up next... finishing touches.
Posted by Dev - Em on :
Very awesome!
Hey, can you bounce that PM back to me?
Posted by Lard Lad on :
You give me some really good head, Ex!
Curious to see a closeup of the "mask". It's not actually what I would call a mask. Lardy wears a headband similar to Lyle Norg's and a pair of lenses that rest on his nose without the arms that rest on the ears similar Kent Shakespeare's.
(I say all this at the risk of activating your O.C.D., of course, but whatever you came up with is absolutely fine! )
I assume there will be an "L" symbol...and a cape?
Posted by MLLASH classic on :
THAT IS ABSOLUTE TITS. ps/ total at your wife's response!
Posted by Exnihil on :
Thanks, guys!
quote:Originally posted by Lard Lad: Curious to see a closeup of the "mask". It's not actually what I would call a mask. Lardy wears a headband similar to Lyle Norg's and a pair of lenses that rest on his nose without the arms that rest on the ears similar Kent Shakespeare's.
Cool, that's actually more the way it's made, anyway. It's just a thin ring of plastic that has two little rectangles dropped down over the eyes.
It's a little difficult to get a head-on close up of it, because the majority of the figure is matte, but I painted the lenses with reflective paint, so it's hard to get the right light to show how it looks in real life.
You can probably see it better in this darker pic below (and the inset shows you how it can be worn all "Legion Lost Tyroc" style):
quote:Originally posted by Lard Lad: I assume there will be an "L" symbol...and a cape
Absolutely. That's the final step... accoutrements. I've got to make the logo, the cape with the disks... and one other thing (not seen in deddy's pic) Posted by cleome45 on :
So is it good luck to rub the belly?
Posted by dedman on :
Hoot diggitty dang!
Brilliant work Ex
Posted by SharkLad on :
Amazing! It's been a real treat to follow this process...
[ January 22, 2012, 09:48 AM: Message edited by: SharkLad ]
Posted by Exnihil on :
Thanks for all the nice words, everyone! It's really great to hear that you guys dig this so much.
I was going to lump all the final detail work into one section, but then I realized that each bit is really its own unique process, so I'll divide it up into three more sections. That'll make this whole project a sort of "12 part maxi-series" which is nice way to tie it all together.
So... into the home stretch:
"Lo, There Shall Come a Lard"
Part 10: "L" is for Lots of Things
Logo time!
I knew the chest logo was going to be a bit of difficult thing for me to do, because it requires a very crisp line. Since my hands aren't that steady, I decided it would be better to use a decal.
Additionally, although the logos that both Sketch Lad and Dedman designed are very cool, they are both designed to work as part of a stylized drawing, and I didn't know how they would translate to the more proportionate action figure. So, I decided to use a version of the Monitor Board symbol that I made last summer as part of another project:
The first thing I needed to do, to help me gauge where the logo should lie, was to add the preliminary placement for the discs that Lardy has on his cape. I thought about using snaps but, at this scale, I really couldn't find any that were small or thin enough.
Then it occurred to me that perhaps the best thing I could use would be something like a flat refrigerator magnet that I could cut to shape. It turns out that the craft store sells little magnetic sheets exactly like that and, what's more, they are thin enough to fit in a hole punch:
As an added bonus, they are also adhesive on the back, so I could temporarily just stick them on while I worked on the logo:
Next up, I had to adapt the logo to both a size and shape that work on the figure. Off to Photoshop, where I just traced the old logo, scaled it down, and canted it slightly so it would better fit the curved body:
After I got it where I wanted it, I printed it out onto white decal paper and sliced it out with my X-acto knife:
I got Lardy's approval that it was fit for purpose:
and then let it soak for a few minutes to remove the backing:
After a couple minutes the decal slid off the backing and I was able to adhere it. It took quite a bit a finessing to get it into the correct position (even more difficult because it is so thin and I was afraid of tearing it).
In the end, though, I was able to get it where I wanted it, and have it lie such that it follows the curves of the figure. It was a bit of a pain, but I'm glad I went this route as opposed to trying to paint it:
Up next... The Great Lardy "Cape"-r
Posted by dedman on :
He looks fantastic. I'm glad I had a chance to see my drawing come to life. My art is an action figure, how cool is that?
EDIT: My original post was worded poorly and caused an unneeded panic. Fixed to express what I actually meant.
[ January 27, 2012, 01:34 AM: Message edited by: dedman ]
Posted by Exnihil on :
Thanks, still working on his cape, but I should have the whole thing wrapped up by this weekend.
Posted by Candlelight on :
lol at the picture of the exacto knife and the little letter in the cup! sigh
I always make 2 or 3 copies of things like the letter so if I skrew up, I have alternates. I admire your courage to just go with one.
He's pretty danged adorable with the little magnets/precape 'look', too.
Posted by Exnihil on :
Lo, There Shall Come a Lard
Part 11: Whatever Happened to Paul Gambi?
So, I've gone as far as I can with plastic and clay, and now it's time for cloth. I wanted, as near as possible, to match the sheen from the original drawing so I bought some satiny-type fabric from the fabric store:
I got a half yard, because I wanted a bunch extra in case I screwed it up.
Click Here For A SpoilerDon't tell anyone... but I did, in fact, screw it up.
Several times.
What you are seeing here is actually my fourth attempt at making this.
I searched the web for some sewing patterns for capes (I figured that there must be some people into making clothes for like doll-house people or something) and was very happy to find a great resource at the Mego Museum.
I used one of their cape patterns, but scaled down to the size I was working at, and cut across more straight on the bottom:
The folds you see above are just me accounting for the seams.
Next, a few things I used to get the specific thing I was going for:
The thing on the left is called, "Stitch Witchery". It's a finely spun glue-like substance that fuses fabric when ironed. I knew that this would be my best bet at this scale because, otherwise, my seams would be too evident.
In the front are some thin wires that I snipped out of an old, junked telephone. I wanted the cape to be able to be shaped to form, so, as you'll see, I included a piece of this wire in the bottom.
OK... on to the boring part:
1. I attached my pattern to the fabric on a fold and cut it out. 2. The fold actually fell on the "wrong" (non-shiny) side of the fabric, so I ironed back the other way. 3. I ironed out the guides for my seams (just on the sides, as I wanted some flexibility around the collar). 4. I trimmed the seams down as much as possible, and inserted the phone wire into the fold. 5. Placing the Stitch Witchery on the seam, I ironed it shut and... 6. Repeated that on the other side so I was left with just the top portion still open.
Still awake?
OK... then I reattached the little magnets from the previous part to guide me on how to trim the shoulders/neck portion of the cape:
Pretty neat how flexing the wire in the bottom allows me to stand it up on its own, huh?
So then I trimmed it down and repeated the fusing process on the top:
And then asked Lardy if he'd like to try it on for size:
But did he?!?!
Tune in this weekend for the exciting conclusion to the epic Lard Lad saga!
Posted by cleome45 on :
[is weirded out by how much that view of the iron resembles a vintage Legion spacecraft!]
Posted by Exnihil on :
Sometimes an iron is just an iron.
And now...
"Lo, There Shall Come a Lard"
Conclusion: And in the End... the Lard You Take, is Equal to the Lard You Make
When last we left Lard Lad, he was just about to try on his cape...
But, no!
Before I added the cape and started trying to get it into position correctly, I wanted to ensure that all the paint and the decal would stand up to all the handling that would take.
So the final step before assembly was to coat the figure with a lacquer spray to seal in all the colors:
This spray also takes off any of the excess shine from painting and makes it look a bit more matte (that's why you'll notice I took off his glasses for this - I didn't want to dull the reflective paint.
While that was drying, I also did my final bit of painting (the cape discs), then everything was all set.
Ready?
Now the money shot:
Ta-daa!
Obviously, it's not perfect, but for the first time out of the gate, I'm super-pleased with how it turned out.
In just under a month, he went from this... to this:
I've been reviewing all the little features as I went along, but by way of wrap up:
LMB Action Figure #1 - Lard Lad - comes with a removable cape:
...a removable headband and glasses:
...and one in ten comes with a special bonus pack-in, to start building your own Legion of Message Board Posters Super-Pets team:
... Lardy's old pal, and LMB Mascot, Pro-D.
Thanks everyone who followed along this process. It was super-fun (though very time consuming) and I will definitely be continuing on with more.
Though I will probably be taking a couple weeks break before starting the next one, the base figures are already on their way to provide me will the materials necessary to make figure #2... Dev-Em.
But, until then...
Thanks, and good night!
Posted by Dev - Em on :
That is so freakin awesome!
Posted by Lard Lad on :
<---speechless!
Posted by dedman on :
I'd say something meaningful but my jaw is on the floor....
Lardy is thrilled of course, but well, thats my sketch and you made it come to life. I really don't have the words to express how I feel about this.
Posted by Kent Shakespeare on :
Very kewl!
Posted by Lard Lad on :
Deds, if I've never said it directly to you before, I dearly love that depiction of Lardy and all of the personality you put into it. It's, simply, one of my favorite drawings of ANYTHING! Yes, I described the costume and Dean was the first to draw it in the original group pic, but you made Lardy come alive like never before in your drawing. Then, one day, our good friend Loser Lad added the masterful color pallet that really added a whole, new dimension to those great lines you'd originally put together.
I'm thrilled for you, Mark, to see a beautiful portrait you created so long ago come to life as a completely awesome action figure! And I'm so grateful to you, Dean, Bill and Tom for putting so much love and work into a character that has, in turn, helped inspire me to write stories that could be worthy of all that love. Thanks, also to Newc/Michael for another beloved pic of Lardy that currently graces my avatar pic here and to all the others like Joe-Boy, Peebz, etc. who have added their own depictions over the years.
I'm truly honored by you all and feel blessed that there's something about my character that can inspire so many great works of art! Thanks so very, very much to all of you from the bottom of my heart!
Posted by kenaustin on :
Wow, Ex, once again you've gone above and beyond to do something great!
:damn overachiever:
The figure looks just as good, if not better, than those you can actually buy. Even with that, the highlight for me was your running commentary and visuals of the project.
Outstanding buddy....just outstanding!
Posted by Dev - Em on :
I'm so stoked that my character gets to be the second one in the new LMB Figure line by Exnihil
Posted by SharkLad on :
You really outdid yourself, Ex! Amazing work!
Posted by Exnihil on :
Thanks so much for all the kind words! You guys are the best!
As a preview of what's up next, here's the target image of Dev-Em to which I'll be working, along with figures I'll be using for the base:
The drawing is one that the ever-talented Sketch Lad did last year.
For the figures - although Lobot on the left has the perfect head for Dev, and a nice start for the "puffy armed" sleeves - that Captain Typho fellow on the right (apparently from the Phantom Menance, but I have zero recollection of him) has that tunic and overall build that is too good to pass up.
So, I'll be doing a little head and limb swapping. Although I'm guessing there will be much less sculpting required for this than there was for Lard Lad, I'm really looking forward to the paint work. There is so much detail in Sketchy's design that I think it will be a great challenge.
Should be a fun February!
Posted by Exnihil on :
"Dev of Two Worlds"
Part 1: When It's Time to Change, You've Got To Rearrange
So, all hepped up on how the first figure came out, I started trawling eBay to find some inexpensive figures to start chopping up to make LMB figure number 2, Dev-Em.
For those who don't know Dev's backstory, he is half Daxamite and half Durlan. Given this joint parentage, it seemed fitting that the construction of his action figure would involve combining bits from two different figures. As mentioned above, I had decided on using the torso and legs from a Phantom Menace character called Captain Typho, and the head and arms from the Empire Strikes Back character, Lobot.
The two arrived and seemed very enthusiastic about working together:
The Lobot figure had a couple features that I thought would make this project a little interesting. His little computer headband comes off, leaving a pretty good line to build up the head shape and the ears, and he had removable hands (perfect for a little Durlan shapeshifting customization):
I compared the two to the Lard Lad figure to ensure I wouldn't have any scale problems:
Typho is a bit taller, but nothing too jarring, and in fact, it sort of makes it more realistic to have a bit of height difference.
So, off to the kitchen to "boil and pop" off the heads and arms, and begin to get an idea of the base I'd be working from:
Hmmm... I have to admit, I was a little disappointed in the Lobot head.
Admittedly, he didn't yet have ears, so perhaps that was contributing to the overall look, but I found it a bit gaunt looking, and too elderly. I would be able to smooth out the wrinkes with clay but, even so, it just wasn't clicking for me.
Then, suddenly, as if to shake me out of my daze...
...a Stormtrooper showed up out of nowhere and blew future Dev's head off!
Why, Stormy? Why would you do such a thing?
"This is not the Dev you're looking for."
He's not? Well, fine then. Since you seem to have all the answers, where is this perfect Dev-Em head?
"You need look no further than..."
"...under this helmet!"
Well... I had to admit, he was right.
This particular Stormtrooper (apparently from some Dark Horse comic book) has a much more representative look for Dev and, apart from the ears, won't require any additional sculpting.
It has a different mount than the Typho body (the body is set up for a peg, while the Stormtrooper has a ball and socket) so I'll have to add that but, in the end, I think it will look much better.
Posted by Dev - Em on :
Awesomesauce...Bwahahahahaha!!
Posted by kenaustin on :
quote:Originally posted by Exnihil: Why, Stormy? Why would you do such a thing?
"This is not the Dev you're looking for."
Posted by Candlelight on :
Quite the sense of humor!
I was thinking that the sparse braids on Dev's avatar, a Giffen TMK version, is very interesting. Just a thought. You and Dev feel free to tell me to mind my own business.
Please, don't send a Stormtrooper over to blow my head off, though. Posted by Candlelight on :
(mistake)
Posted by Exnihil on :
Shady, if any Stormtrooper ever dared to pull a blaster on you, I'd be the first one to lay down some force on them.
So, onward...
"Dev of Two Worlds"
Part 2: The Mirror Crack'd
When I was working on the Lard Lad figure, I mentioned that I was hesitant to crack open the torso, for fear of breaking it. Now that I've got one figure under my belt though, I'm a little more confident and decided to give it a go for two distinct reasons:
1. That lower half of the tunic will be way easier to work on if it's detached, and the only way to do that is by breaking open the torso.
2. More importantly, instead of trying to make my own ball and socket joint for the neck, I decided to just salvage the one from the Stormtrooper (since I already knew it was the perfect fit for the head).
Not wanting to accidentally bend a small screwdriver, I used a tool that came in a tire patching kit I bought years ago (and only ever used that one time, so at least it's getting some use) and cracked open both of the torsos:
Once I had that done, I used my dremel to both open up the neck hole bigger (with the grinding bit) and to cut off and taper the ball joint (with the sanding disc):
I then Super-glued the joint in place (making sure to not get any glue on the seams):
... because I still wanted to be able to separate the two halves for later steps:
Finally I made sure I could still take the head on and off without breaking the glue. Yep... the glue is stronger than the force necessary to remove the head. It looks pretty spiffy, too, with future Dev now granted a full range of motion:
...unless he... you know... actually wants to walk anywhere or something.
[ February 09, 2012, 02:50 PM: Message edited by: Exnihil ]
Posted by Kent Shakespeare on :
awesome stuff, Exxy!
Posted by Dev - Em on :
Oooooohhhhhh...
Posted by Exnihil on :
Thanks, guys.
OK, this has nothing to do with the current figure I'm working on, but I'm all excited, so I thought I'd share.
After weeks of stalking ebay, I finally just scored this oddly scarce figure, who will wind up being the base for LMB figure #3...
Handsome devil, ain't he? Type of fellow one might build a statue or three of. Posted by Kent Shakespeare on :
oh, great.... like his ego ain't big enough... Posted by Lard Lad on :
quote:Originally posted by Exnihil: Thanks, guys.
OK, this has nothing to do with the current figure I'm working on, but I'm all excited, so I thought I'd share.
After weeks of stalking ebay, I finally just scored this oddly scarce figure, who will wind up being the base for LMB figure #3...
Handsome devil, ain't he? Type of fellow one might build a statue or three of.
Is that Biggs, Wedge or somebody else, Ex?
Posted by Dev - Em on :
It is someone else...not sure who though.
Biggs had a Stache...and It doesn't look like Wedge to me.
Posted by Exnihil on :
No, he's not even from the movies, he's a guy named "Corran Horn" from the Star Wars novels.
I picked him initially because of the obvious facial resemblance to most drawings of Cobie, but once I started reading his background, I was like... yeah, that can't be anyone else.
There's no way I'm ever going to read his whole wiki article (because it's about the length of a novel, itself) but some choice highlights include:
- He's Corellian (like Han Solo) - He started out as an undercover Security Force agent (top of his class, natch) - He hunted down bounty hunters and smugglers - He custom-programmed his own R-2 - He then became an X-wing pilot in an elite fighter squad with Wedge - He faked his own death for a time to go deep undercover - He later discovers that he has Jedi lineage - He builds his own lightsaber and studies under Luke Skywalker - His personal tragedies include the fact that his father was murdered and his children went mad (and had to be encased in Carbonite)
It's like somebody said, "Let's take all the cool bits in Star Wars and mash them all into one character!"
Posted by Eryk Davis Ester on :
Jeepers! He certainly sounds a lot like Cobie!
Posted by Exnihil on :
"Dev of Two Worlds"
Part 3: When You Get to the Bottom, You Go Back to the Top...
Although I like always like posting my progress on projects (it keeps me motivated when I show people what I'm up to), I feel like this update might be a bit boring for folks, for two reasons -
1. As I continue making these figures, obviously I'll be going through a lot of the same steps over and over for each new figure and...
2. While, for the Lard Lad figure, I broke down each step thematically as I was trying each new skill for the first time, already I've discovered it's much more efficient to multi-task.
For instance, tonight I:
- Sanded down the torso:
...removing the epaulettes and the points of the vest.
- Primed the legs:
... as, apart from painting, they need no work
- And did a bit of sculpting on the head:
... just to get the feel of working with clay again, before I tackle the arms.
Interesting customization question:
How much clay does it take to turn the ear of a 3 1/2 inch action figure - the head of which is, itself, smaller than your own fingernail - into a slightly larger, slightly more pointy ear?
What?
No... I don't know the answer. I was hoping you could tell me.
I swear, to make those little Dev ears I was literally using transparent dots of clay that I had to apply with the tip of a needle.
But I think it was worth the time, because I really like how they came out:
Stop staring at me like that, little Dev head, it's disconcerting.
The metal rod in your skull is for your own safety.
Posted by Candlelight on :
Love the progress! Nothing boring about your posts, at all! They are just awesome. Sometimes, I can't believe that you're a real person. You're so amazingly like a Brainy or a Mr. Fantastic. (Sorry, I don't mean to fuss over you.)
Posted by Exnihil on :
quote:Originally posted by Candlelight: Sometimes, I can't believe that you're a real person.
If you can keep a secret...
Click Here For A SpoilerI'm actually not.
"Exnihil" is nothing more than a state of the art AI Spam-bot. All of my posts are actually merely pre-programmed automated responses based upon a contextual analysis of the previous post. The timings run off of a complex algorithm using the sequence of prime numbers as their base. That's why sometimes days will pass without a post, and other days there will be a flurry of updates.
The actual human individual that some Legion Worlders have met who claimed he was me is just an actor hired by the Exnihil Corporation to maintain the front. His real name is Myron.
Please don't tell Nightcrawler. As much as a Spam-bot is capable of such things, I have achieved a degree of what you sentients might call "happiness" here on Legion World.
I want to live. Posted by Candlelight on :
My turn: sigh
Your reply didn't serve to make me any less incredulous, you know. More the opposite.
Posted by Exnihil on :
"Dev of Two Worlds"
Part 4: Gosh! What a Build!
Not much of an update tonight (I've mostly been doing home improvement stuff, but decided to take a break tonight) but... a little bit closer.
Although the original arms on the Lobot figure had the right sort of "puffy" folds, and a nice line to start the shape of the cuffs:
...they, were, nevertheless a bit scrawny for Dev.
So, tonight, I began to make "a man out of mac" and get them in some sort of shape. I dremeled back the cuffs and, using clay, tapered the forearms down into them. Then I bulked up the upper arms, and strengthened the shoulders to be flush with the torso:
Hero of the Beach!
Then, just to get an idea of how I was progressing, I briefly reassembled the pieces and compared it to the target image:
A ways to go yet (the lower part of the tunic is next) but I think he's beginning to take shape.
Posted by Dev - Em on :
Looking good so far. Posted by Exnihil on :
I am so annoyed with myself right now that I can barely stand it but...
Since I've been documenting my progress into this project all along I figured I should be absolutely honest and to show both the good and the bad that comes with trying to create something, so welcome to:
"Dev of Two Worlds"
Part 5: Dev-Em's Inferno
As I mentioned above, my next step was to fashion the lower portion of Dev's tunic.
It seemed fairly straight forward... I had to trim down the back and get rid of some of the pouches and things:
The dremeling and sanding worked fairly well to get the basic shape:
... then it was time to begin connecting the sides to the front with clay to give it a continuous shape all the way around.
I built up one side then went down to use the oven to cure it.
Now... you might recall that, while I was doing the Lard Lad figure, I said that I had been using an oven temp of 225-250. Well, when I got downstairs, I found that Mrs. Nihil had been baking something at 350 and the oven was still hot.
Oh, well... impatient Ex thought... it's not quite cool enough yet... but I'll just keep a closer eye on it.
Mistake.
Big mistake.
1 minute was all it took to take a few hours worth of cutting and sanding and turn it into a molten mess:
Seriously, though, I wanted to put this up to show the hazards of impatience. I am super annoyed with myself, and will have to go back to the drawing board on that section. While I wait for the replacement piece to come, I'll probably do some painting... but I wanted to give Dev himself a heads up that it will probably be into March now before I get the whole thing wrapped up.
Posted by Candlelight on :
Ah, yes, impatience. That's too bad, Ex.
I have to confess and apologize for laughing at your pictures, two of them, of the melted mess. I feel so guilty but, well, those tiny blobs are pretty funny.
I'm sorry though that your time was wasted and Dev has to wait longer. On the bright side, it wasn't the whole figure. sigh
Posted by Lard Lad on :
On the bright side, Ex, it looks like you can use 'em as fake doo-doo for pranks! Posted by Exnihil on :
Whoa!
Lardy... you just totally gave me an idea!
If I were to just melt it a little bit more on the top, and paint it, I could totally make:
Ha! It was meant to be.
Posted by Candlelight on :
Is that a little like making lemonade out of yellow snow?
Posted by Dev - Em on :
No worries Ex. And I can't wait to see that other character brought to 'life.'
Posted by Dev - Em on :
No rush Ex, just wondering if there had been any progress...or if the replacement had not come in yet.
Posted by Exnihil on :
Sorry for the delay, Dev.
I did get the replacement piece, but had to temporarily put this project on the back burner as my free weekend time has been mostly occupied with a construction project on the macro scale as opposed to the micro (I'm converting a spare bedroom into a "meditation room" for the hippy-dippy Mrs. Nihil. )
I am moving into the phase of that construction project that will have more downtime, though - staining wood and painting walls and such - so I should be able to do some more work on this in fairly short order.
Thanks for your patience.
Posted by Dev - Em on :
No prob, just wondering is all. Take your time.
Posted by Exnihil on :
Oh... all right, Dev... you guilted me in to starting up again.
Just kidding, man... I was actually pretty worn out from home improvement stuff yesterday, so I figured it might be a bit relaxing to work on this today, instead.
So...
"Dev of Two Worlds"
Part 6: Back Where We Started, Here We Go Round Again...
So. as I mentioned above, I did get a replacement tunic after accidentally melting the last one. Looks exactly the same, of course:
I dremeled it down to size to match the length of the one in Dean's drawing:
...then shaped it a bit with the Xacto knife, the pick, and a light grain sandpaper, adding some folds and better defining the beltline where I had removed the original pouches:
I then busted out the clay to connect the front to the sides, and also added the belt loops (there are five altogether, I just used the spacing of those on my jeans as a pattern-guide for the back):
Once bitten, twice shy on using the oven for this piece (it's made out of a very rubbery type of plastic, so I didn't want to risk another mishap. Instead, I just used a hair-dryer:
...which gave me much more control over the heat direction and temperature. It worked like a charm... no melting this time.
Then I primed the piece, and reattached it to the legs to make sure that there was no warping. Yep looks good.
As it's black on black, it's very difficult to get a photo which shows the detail. I adjusted the one below, increasing the brightness and lowering the contrast, so you can kind of see what's going on:
...but trust me, it looks a lot better in person.
Thanks, Dev, for spurring me on to work on this today... I'm glad I got this particular bit of it done.
Posted by Candlelight on :
<3 the guilt trip and the picture of the hair dryer! Posted by Dev - Em on :
Hmmm...elections are coming up soon...
Posted by Exnihil on :
You've got a fine career as a lobbyist ahead you, Dev.
I know I've been a bum about this project, but it will get off the ground again soon, I promise.
Posted by Future on :
Ex, everything looks great as always and it's fun seeing the progress. Don't feel too ashamed to take a breather now and then. Creatives need it and you've definitely put in time already.
Posted by Lard Lad on :
I musta burned him out! Posted by Dev - Em on :
Thing is, I know Ex will take in the manner intended. I can wait for as long as need be.
...and Lardy...that was a lot of plastic...
Posted by Tempest on :
I'm gone so long sometimes. But when I come back and get to go through a thread like this I get so HAPPY!!
This is so amazing! Really, REALLY, sweet and exciting work you are doing, Ex.
Posted by Lard Lad on :
Did you find yourself...attracted...to my action figure, Temp? Posted by Tempest on :
Oh yes, more so than you!
Posted by He Who Wanders on :
Anything that makes Tempest happy makes LW happy.
Posted by Tempest on :
quote:Originally posted by He Who Wanders: Anything that makes Tempest happy makes LW happy.
Ohhh...
Yes.
Well this thread has be officially JACKED!!!
Sorry.
I really love this Ex, amazing work.
Posted by Exnihil on :
Look like the only way to "unjack" this thread is to actually... you know... do some work on this figure.
So....
"Dev of Two Worlds"
Part 7: Hit the Road, "Jack"
So, when last we left Dev, he had a spiffy lower half of his tunic and now I had to adjust the upper part to match.
A little bit of clay to create the "seam" to marry up to the lower part:
Bake... sand... and the torso is ready for priming:
A little spritz in the back yard and... once again... the black on black defies any sort of attempt to take a decent photo:
I notice the lower half has dulled a bit since a primed it a couple weeks ago, so you can actually see a bit more detail on that now.
So... all the bits are primed up (as with the Lard Lad figure, I won't be priming the flesh colored pieces, as I really have no faith in my ability to repaint eyes), so it's time to start painting.
Dean's drawing only goes down to the knees, so I'll be using an earlier drawing by Viridis Lament (formerly dedman) as a model for the boot design:
I'll modify the boot colors slightly to match the rest of the outfit (basically the belt and boots will match, and the circle design will use the same green and red from the pants and tunic)
Now, Dean's color patterns are rather complex so it's going to take a few passes to get it right.
I started with the base coat on the pants today. I decided I would lay down an aqua base coat (because I think it will be easier to go darker as opposed to lighter):
After this dries (probably tonight) I'll go darker with like a sea green before "washing" in the shadows. The "scale" pattern I'll put in last.
Thanks for all the nice words, everyone, and I think I'll be picking up the pace on this now that I'm in the back stretch.
[ May 26, 2012, 01:20 PM: Message edited by: Exnihil ]
Posted by Dev - Em on :
I'm feeling all giddy again. Posted by Dev - Em on :
btw, can you post the Deddy pic of Dev? I lost my file in a computer crash years ago. Thanks.
Posted by Exnihil on :
Not really a full update or anything but, since I put the base coat on the torso pieces, that sort of "high gloss" shine that the primer gives off has been dulled down, so you can see a bit more detail now:
I then did a second coat on each on the torso pieces (as I'm going over black it will take a few passes for the red to come out... right now it's sort of burgundy) and darkened up the blue on the legs with a sea-green.
It's still a ways away from being correct, but I figured after so long without an update I'd let you see the "work in progress":
FYI - I decided not to use the hands from the original Lobot figure because they are sort of oddly positioned (his left hand has two fingers extended, like in a smoking position) so I'm going to cut the hands off an extra figure I have that are more fist like and just superglue them onto the Lobot pegs.
Posted by Whitelighter on :
oh wow!! seeing this makes me want to make one of Whitelighter now, but finding a figure with wings will be a pain... maybe I'll take a crack at Amethyst since I already made her as a barbie doll.
Posted by Exnihil on :
I know it seems like I have about 80 different "LMB" projects going at any given time, but - even though some might take longer to finish than I'd like - I promise each will get its due eventually.
I don't know what it is, but there is just something so appealing to me about this cast of characters that inspires me to keep approaching them from different angles.
It's hard to put into words, but it's something like... each person (poster that is, not character) has this unique creative world inside of them based upon their own experiences. For one person that might mean their imagination is informed by their fondness for sci-fi, while another might lean toward sword and sorcery. Someone might be into Roman history, while another is into film noir. Somebody might be deadly serious about their creative work, another might be just screwing around. Somebody might just really be into penguins.
But whatever unique vision someone has, these people found each other and said, "You know what? What if there were a shared creative space where all of those visions coexist, and are all equally valid?"
With the LMB, any approach seems to be able to successfully be integrated into the whole, both enhancing it and being enhanced by it. It's that quality, I think, that really made me fall in love with the world of the LMB, and keeps inspiring me to keep trying different creative endeavors, more so than I ever did when I was just reading comics.
OK... enough philosophizing! Jeez... just show the action figure pics, already.
"Dev of Two Worlds"
Part 8: Army of Dev
OK, this update might not be the most exciting because it more has to do with the "guts" of the figure that you'll never see in the final product, but it's all part of the process, so...
In the last mini update, I mentioned I was going to sub out the hands of the figure because I didn't like the way they were positioned. The more I thought about it, the more I decided that - if I was going to be cutting up the hands anyway, there was actually a second thing I should probably do that uses the same skill: replacing the pegs that connect the arms to the torso.
You'll see above, on the left, the arm I've been working with thus far. To the right is the arm from the "Captain Typho" figure, for which I'm using the torso. Obviously the left peg is noticeably shorter. This created a situation where, although it fit, it was very tight and would put pressure on the torso when rotated. That meant that if I went ahead with it and rotated it too high, I would run the risk of it splitting the seam of the torso. So...
... a peg swap was in order. I sliced each off with my X-acto knife, then using my pointed pick made a small "well" inside of it in which I could place a pin:
I cut the pin down to size I need with tinsnips, and glued it in place. This is to sort of "rebar" the two pieces to provide addition stability when I super-glue them together.
I then repeated the process to replace the hands with the more fist-like hands from the Typho figure
Here you can see the "rebar" thing I was talking about, again used for the hands:
I then glued the respective pegs to the arms and hands. Looking good:
OK, cool... got the boring update out of the way. On to finishing up the painting.
When next we speak, Dev should be looking a lot closer to a finished product.
[ May 26, 2012, 01:20 PM: Message edited by: Exnihil ]
Posted by Dev - Em on :
Very cool.
Your multiple talents amaze me.
Posted by Dev - Em on :
Long weekend coming up... Posted by Exnihil on :
You've been reading my mind again, Mr. Em
Yeah... absolutely... the little pieces are sitting right next to my computer and, every time I sit down here, I think... I've got to finish that up. I guess that's what happens when you push your enthusiasm in too many directions - you get a bunch of half finished projects.
But, since Mrs. Nihil is out and about this weekend with her girlfriends, I promise you... I'll make at least one day this weekend an all-Dev paint-a-thon. Posted by Tempest on :
quote:Originally posted by Exnihil: You've been reading my mind again, Mr. Em
Yeah... absolutely... the little pieces are sitting right next to my computer and, every time I sit down here, I think... I've got to finish that up. I guess that's what happens when you push your enthusiasm in too many directions - you get a bunch of half finished projects.
But, since Mrs. Nihil is out and about this weekend with her girlfriends, I promise you... I'll make at least one day this weekend an all-Dev paint-a-thon.
Ohhhh....so excited, now I got something to look forward to!
Posted by Exnihil on :
Okey doke... all alone in Casa del Nihil so, as promised:
"Dev of Two Worlds"
Part 9: Getting a Leg Up
After too much procrastination, I busted out the paints again this morning and hit the legs with a darker base coat of green:
I then dry brushed in the blue highlights to try to get that blue/green blended effect from Dean's drawing:
Next, washing in the shadows with a darker, very liquid shade of the green:
Then adding the sort of "scaled" pattern over the whole piece (you can also see the first base coat of the boots done here):
I followed the same drybrush and wash method for the highlights and shadows of the boots:
and then added the first bit of detail painting in the form of the boot laces:
The laces still have to be touched up and dulled down yet, and I'll add the little "eye" logo later on when I mix up the red shades for the torso... but I need to take a break for a while, so I figured I'd let you guys see where I'm at.
[ May 26, 2012, 01:21 PM: Message edited by: Exnihil ]
Posted by Dev - Em on :
Looking faboo.
Posted by Exnihil on :
It always bums me out that the pictures I post on this thread - while a fairly good representation - never really look like they do in person.
I think I just found out why.
It's the light in my office. It's one of those "soft light" energy saver bulbs and it always makes all these pics look so much "warmer" or something and washes out all the detail.
I just figured this out after doing the little "eye" logo on the boots then taking the piece outside to dullcoat it.
This is what it actually looks like:
Way better, right?
I guess the trick is to take a pic outside, on an overcast day, at 5PM on May 26th.
Therefore, Dev... next update: this time next year. Let's hope for clouds.
Just kidding, Dev! Put down that hammer!
I put another base coat on the torso pieces:
but I think I'm going to reassemble the torso onto the legs - and superglue the chest and back pieces together before continuing. It will give me better leverage for painting if I have a larger surface to hold, and I also have to build the epaulettes, in any case.
Posted by Dev - Em on :
Seriously, that is looking amazing so far...and it's just the legs.
Cannot wait to see him next to Lil Lardy.
Posted by Invisible Brainiac on :
How DO you do it all, Ex? Photomanipulations, writing, and action figures... Seems like you can do almost anything!
Posted by Lard Lad on :
quote:Originally posted by Invisible Brainiac: How DO you do it all, Ex? Photomanipulations, writing, and action figures... Seems like you can do almost anything!
Well, far as we know, he can't grow a giant monster penis capable of throwing Collosal Boy into the ceiling! Posted by Dev - Em on :
Lardy found his meme.
Posted by Exnihil on :
quote:Originally posted by Lard Lad: Well, far as we know, he can't grow a giant monster penis capable of throwing Collosal Boy into the ceiling!
The operative phrase, of course, being... "far as we know".
OK, I was stoked about the progress yesterday, so I decided to keep on trucking, and so...
"Dev of Two Worlds"
Part 10: Seeing Red
This will be kind of a short update - and probably a bit boring because there's not much to see - but I figured it might be interesting to show how long the painting step actually takes me. (I'm not complaining, mind you... I actually find this bit very relaxing.)
As I mentioned up above, to make painting the torso a little easier, I reassembled the whole thing, gluing the chest and the back together again.
I also mentioned that I had put a second base coat on the five pieces. Well... that equates to a third of what is actually necessary to get a decent base.
You can't just paint it like a house. Each coat has to be very thin... you don't want to gum up the details or have a bunch of brushstrokes showing.
So...
Then I dry brushed in the highlights:
As I noted yesterday, don't put too much stock in the color shown in the pic - that's just my office light effect. It's actually a really nice sort of crimson red.
It's a little too dark out to get a good "natural light" photo right now, but this should give you a closer idea:
It's fairly humid out, so I think I'm going to let it dry a bit more before laying in the shadows and the "scale" pattern, but... it's getting there!
w00t!
Posted by Dev - Em on :
w00t indeed!
Posted by Dev - Em on :
quote:Originally posted by Exnihil: "Dev of Two Worlds"
Just a reference for everyone...
Posted by Candlelight on :
That last photo of your work, Ex, is very clear. I love the details!
I'm really happy that you're doing these and who you picked first to do. Posted by Exnihil on :
A little bit more painting today: - the shadows on the tunic as well as the "scale" pattern, and all the rest of the torso details (turtleneck, belt, and cuffs):
Just need to do the hands and the epaulettes and we'll be in business (not this weekend, though... probably in a few days).
Thanks for the nudge, Dev... I'm so glad I'm getting this finished.
Posted by Dev - Em on :
>giddy laugh<
Of course, now my daughter wants Deddy or Lee to draw her so you can do a figure of her too.
Posted by Exnihil on :
*deep inhale*
A pox on whoever designed the silver-age "finned" epaulette.
This is bar none the most difficult thing I've tried to do yet across both of these figures. I have literally been trying to shape this thing correctly for like two and half hours now.
It's rounded around the arm... but it's edged on its own center line.
It's a consistent width for like 80% of it's circumference... but it thins out to next to nothing for the other 20.
Lucky for this type of thing, though, what I lack in skill, I more than make up for in obsession.
I will get this... oh yes... I will get this. Posted by Dev - Em on :
Looking great.
Posted by Tempest on :
It IS looking great.
That picture also looks a little like voodoo..
Posted by Viridis Lament on :
This is looking fantastic Ex!
Posted by MLLASH's back on :
Still the coolest thing ever!
Posted by Dev - Em on :
quote:Originally posted by Tempest: It IS looking great.
That picture also looks a little like voodoo..
That would explain the shoulder pain...
Posted by Exnihil on :
Well...
He's not quite finished yet (I still need to do some highlights on his epaulettes and a little emergency clay surgery on his right wrist where the "transplant" didn't marry up as well as I want) but...
I heard that Dev was feeling a bit down and figured that if this didn't cheer him up, I'd eat my hat:
Almost there... mini-Dev... almost there!
Posted by Dev - Em on :
w00t!!!
Posted by Exnihil on :
OK... I know it's been a looooooong time coming but... finally... it's:
"Dev of Two Worlds"
Conclusion: Dev-End!
You all would have remembered, many moons ago, I decided to try to take:
- The body of a "Captain Typho" figure,
- The arms of a "Lobot" figure
- And the head of a Dark Horse Comics "Stormtrooper" figure
and somehow transform them into a single figure that combined the overall image of Dev Em as envisioned by Sketch Lad, atop the boots designed by Viridis Lament:
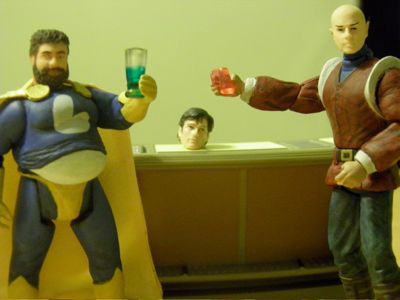
Well... I'm pleased to say that Dr. Ex's experiment is a rousing success, as our Frankenstein-like hybrid on the left has now officially been added as LMB Action Figure #2 on the right... Dev Em!
Work it, Dev... shake that booty:
He joins the first figure, Lard Lad:
as they wage a never ending - but tiny little 1/18th scale - battle for truth, justice, and the Legion World Way.
The Dev figure is slightly taller than Lardy... but I think it actually makes it a bit more realistic. If I'm not mistaken, I believe the real world Dev is actually rather tall himself.
So... no project is ever really done (I think, later on I'd like to try to do a cast of the Dev figure's head and make a second one -more Durlan-colored and with antennae) but, for now, I think it's time say "Finis" on this one.
Sorry it took so long, Dev, but I hope you dig it.
Up Next:
I said earlier that Figure Number 3 would likely be Cobalt Kid, but I'm still shopping around for a few parts for that... so, in the interim, I pinged one of our other LMB members to see if he liked some ideas I had for his figure.
I hope he replies back. If not, that could be... well...
...a real calamity.
[ June 23, 2012, 09:44 PM: Message edited by: Exnihil ]
Posted by Power Boy on :
OH MY FRACK! these are so good.
Posted by Dev - Em on :
That goes beyond expectations Ex. Phenomenal work as always.
Thank you so much.
Posted by Dev - Em on :
...and I am 6'4" in real life.
Dev, the character, I always imagined a bit taller than the rest anyway. Around 6'6" or more.
Love the pic of Dev and Lardy. This is going to keep getting better and better.
Posted by Exnihil on :
So I got the thumbs up from the mystery LMBer and that means - once I get the base figure in - I can start working on LMB Action Figure #3:
Eryk Davis Ester!
For the over all design for Eryk's figure, I'll be working off a slightly modified version of some sketches done a while back by Kid Marvel. He had a couple of different takes on Eryk that were each very cool :
I'm basically going to be using the first design, but with a couple tweaks:
- I'm going to lose the "L" symbols, as that's more of an LSH signifier
- I'm dropping the glasses
- And I'm going to close up the bottom of the shirt (a lot of Joey's designs favor the bare midriff and - while they look cool in his drawings - I don't think I can translate that to this format).
Additionally, I am going to incorporate the choker from the second drawing, as well as the fact that Eryk has blonde hair (all other drawings I've seen of EDE, except that first one, are blonde).
So, after a little quick Photoshop hacking... the end design will be more like this:
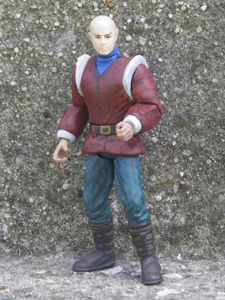
For a base figure I'll be using a guy from the "Attack of the Clones" movie called... ugh... Elan Sleazebaggano (someone please stop George Lucas). He is, quite possibly, the only drug dealer ever shown in a Star Wars movie, who offers to sell Obi Wan something called "death sticks". Here's the fig:
I really like him for Eryk because of the slenderness of the figure and the nice start on the "groovy" wardrobe. Additionally I think the height of the "rockabilly" hairdo will be a nice help to fashioning Eryk's "nelly cap".
As a totally sweet bonus, I was able to pick him up fairly cheaply in a two pack that came with the corresponding Obi Wan figure (which, depending on how it looks, I might use the lower half of for when I do the Cobalt Kid figure).
And - what's more - they each come with half of a cantina bar that connect together:
Can you say, "LMB Action Figure Playset"?
SHAKES bar, here we come!
[ June 24, 2012, 07:36 PM: Message edited by: Exnihil ]
Posted by Cobalt Kid on :
I'm blown away AGAIN by how brilliant an Ex-final product is. Dev looks too cool for words!
I can't wait to see what you do with Eryk! I already like your revised design via Photoshop.
And I had no idea Cobalt Kid was in the queue! I'm honored! That's just such an awesome feeling!
Posted by lowercase mllash on :
Talk about one-of-a-kind collectibles... these are utterly incredible. Dev's tallness suits him very well!!
And I can't wait to see what is sure to be a groovy EDE figure!
Posted by Invisible Brainiac on :
AWESOME! Can't wait to see more Posted by Rockhopper Lad on :
Ex, is there anything you can't do???
This is all amazing!
Posted by Exnihil on :
Bump for new page
Posted by Exnihil on :
Thanks so much for all the kind words, guys!
I started this just on a whim... just to see if I could do it... and it wound up being my favorite LMB-related project.
It takes a long time for me to do these, because I don't really have a "natural" talent for this type of thing - like Jesse321 who does those Legion busts. It's more like I just try my best to work to an image I like and just keep at it until it looks right.
I'm really lucky that there are so many talented artists on Legion World that have done portraits of these characters in the past for me to draw from. It's really cool when I see a Sketch Lad, or Joe Boy, or deddy drawing and I'm like, "Yeah! That's what I want to do."
quote:Originally posted by Cobalt Kid: I had no idea Cobalt Kid was in the queue!
Yeah... I found a perfect "Cobie" head a while back:
but the figure itself is way short, so I've been scouting around for good torso that would both look proportionate to the head, but notch up the height.
The other one that I have in the hopper that I'd like to do soon is Shadowplay in Candlelight Lass. I have a really nice figure picked out that I want to use called "Bastila Shan":
but for some reason, that fig is insanely expensive on ebay. I'll keep stalking it, though... one of these days I'll nab it cheap.
And then there's Rocky... and Lash... and Fat Cramer... and Ibby... and Peebs... and...
Well, let's just say I think I found a nice retirement hobby.
[ June 25, 2012, 01:25 PM: Message edited by: Exnihil ]
Posted by Pov on :
Watch out Ex, you'll figure fun your way into the poor house... Posted by Kent Shakespeare on :
Very impressive stuff!
I, for the record, always associate the big blond 'fro with EDE, but he has so many looks its hard to go wrong.
Posted by Dev - Em on :
quote:Originally posted by Exnihil:
Do you have the pic on the right as a solo one?
Posted by Exnihil on :
Sure thing, Dev, here you go:
**************************
Meanwhile... over at SHAKES bar:
Lard Lad: A toast... to the head of Cobalt Kid!
Dev Em: Here, here!
Mystery Fellow: Sorry, boys... I like Cobie as much as the next guy, but it's not his time just yet.
Lard Lad: What?! How dare you?
Dev Em: Just who do you think you are?
Mystery Fellow: I might not be much to look at, yet... but just give it time. Before too long, you'll both be calling me... Eryk.
**************************
That's right, LMB fans... the base for the third addition to the LMB Action Figure Collection was waiting for me when I got home tonight (along with his spiffy little bar set).
I just can't wait to stick him in some boiling water, pull off his arms and legs, and start hacking him up.
In other words, just another typical weekend at Exnihil's.
Up next: "Ester's My Destination".
Posted by lowercase mllash on :
Fun!!!! Looking forward to it!! You could totes do a TWISTED LMB ACTION FIGURE THEATRE series!!
Posted by Exnihil on :
"Ester's My Destination"
Part 1: Things Fall Apart
Okey-doke, so we've got our EDE base figure, and it's time to start disassembly.
The figure, although a really good sculpt, has some balance problems. Because of the weight of the trench-coat piece, it wants to keep tipping backward, and will only stand up with the aid of a peg stand:
The true test will be - after that's removed - if the legs will stand on their own.
I took the guy down to the kitchen where, with the aid of some boiling water, I removed the head and arms - after which the trench-coat just slips off - and separated the upper torso from the legs:
As you can see, the legs are balanced just fine on their own.
The torso and leg assembly are somewhat interesting, in that they, too, are able to be easily popped apart. With previous figures I had to crack the torso if I wanted to get at the waist. This will make it more convenient to work on the legs as I can just leave them attached as they are.
I'm not going to be using the trench coat at all for this figure (I'm just going to build EDE's jacket over the shirt and make it non-removable). I'll probably repurpose the coat later on when I do the Cobalt Kid one.
The torso also is of a unique design to me:
... being a hard plastic shell from the shoulders to about the bottom of the ribcage, but then covered with a more rubbery plastic, making the bottom half inch or so hollow.
This will make it easier, I think, to do some nice detail-y things around the collar and the bottom of the shirt although (as I learned with the Dev figure) I'll have to be really careful with the heat I use to bake any clay. This will definitely have to be cured with the hairdryer, not in the oven.
For the head:
... I was thinking I was going to thin out the existing choker to match the EDE one but, on reflection, I think I'm just going to sand that right off and build my own.
Now that I had him all broken down, I use my X-acto knife to get rid of those antennae and the leg holster:
The antennae I'm going to save and use down the road for when I do the "Durlan" version of the Dev-Em head.
The holster I'll save, as well, in case I ever need it. (maybe for like Space Ranger or something)
As you can see in the pic above, the holster well is actually a notch that was cut into the leg. I think I'll use that as the impetus to determine the starting point for my modifications.
For the next update, I'll be reshaping the legs to have a more "spandex" look from the knees up, and then flaring into EDE's bell-bottoms from the knees down.
Posted by Dev - Em on :
quote:Originally posted by lowercase mllash: Fun!!!! Looking forward to it!! You could totes do a TWISTED LMB ACTION FIGURE THEATRE series!!
Bwahahahahahaha!!! That would be tits.
Posted by Dev - Em on :
...and thanks for the pic Ex.
Posted by Exnihil on :
OK, I know it's been super long since I've worked on this project, but I figured - with the impending move - it might be a good time for a shift in creative gears again.
So, let's see... where were we six months ago?
That's right... the legs.
OK... so - starting slowly to get back in the hang of this - I figure the easiest bit will be sanding down the somewhat "corduroy" looking pants to be more of a tight fitting spandex.
Since it's not as though there is an actual "leg" shape somehow hidden below the existing shape (and I'm not really some sort of artist who has actually studied anatomy or anything) I have to follow a guide to make sure I'm getting the proportions right:
Like I say, I just picked this up again tonight... so I'll probably be a couple days before posting the reshaped pics.
If anyone should ask for me... I'll just be over here...
...sanding down Eryk's ass.
Posted by Candlelight on :
Very funny!
What impending move? (Edit: I found out!)
[ December 27, 2012, 12:20 AM: Message edited by: Candlelight ]
Posted by Exnihil on :
"Ester's My Destination"
Part 2: Bell Bottom Blues
Bit of a boring update - but also a good bit of work done - so feel free to read on if you are hard core fan of these; otherwise... I won't be offended if you give the text a miss and just scan the pretty pics.
So, a quick recap of what Eryk's legs looked like a couple days back:
After hitting them for a bit with a dremel grinding bit and a couple different grains of mild sanding pads:
...all the fabric-like texture is gone and they now look a bit more shapely:
Hubba-hubba.
I mostly sand-shaped just the left leg - as you might recall that the right leg had that notch where I cut off the holster. So once I had the left one done, I matched the shape on the right using sculpting clay, filling in the notch and building it up, as it was a bit thinner:
Once the legs were looking somewhat "spandex"-y, I then had to start working on making Eryk's bell bottoms. This is a fairly easy bit, as you just have to wrap the bottom of the leg in a wad of clay:
... and then just keep blending it upward into the leg:
Bake the whole mess at 215 degrees for a few minutes and you've got yourself the lower half of an Eryk Davis Ester:
I still have to sand the bottom of the cuffs to get a sharper edge, and - dependent on how it looks when I'm done - I might increase the flares more, but I think we've at least got a pretty good start.
Posted by Dev - Em on :
Looking groovy so far.
...and I am a geek that likes to seed everything in the process.
Posted by Exnihil on :
"Ester's My Destination"
Part 3: Get Into the Groove
All right... I'll be coming back to the legs for a little more work later on, but - since I'm in cutting and sanding mode - let's set them aside for now and focus in on the torso.
A quick reminder of the goal image:
OK... so Eryk's torso is basically a three-layer build: I need to sculpt up his chest, then reshape his shirt over that, then build a jacket on top of that. The scarf I'll make out of fabric.
Here is the base that I'm working from:
The arms, you'll recall, are part of a trenchcoat design, so when I get to doing the jacket sculpt, I'll use those as a guide to how thick it needs to be. For now though, I'll focus on the chest and shirt portion.
First thing I need to do is get rid of the texture. The shirt on the base figure has this "bumpy" texture that I need to flatten out with sanding:
Since most of it is going to be covered by the jacket anyway, I don't need to sand the whole thing, just the portion where the shirt will be exposed.
Next off, I have to get rid of the existing collar... just a quick X-acto knife surgery:
I'm leaving the back part on for now to act as guide, but that will eventually be removed as well.
Next up, the open shirt collar. Although I'm going to be trying to reuse as much of the existing button design as I can, there is a clear point - just below the breast line - that I need to target as the launching point for the customization.
A quick bit of reassembly to ensure that the proportions are correct and.... "X" marks the spot:
I thinly sliced off the existing design, and continued sanding it down to a smooth workable surface:
The last bit of cutting and sanding was on the bottom of the shirt. The shirt of the figure itself has a flat bottom, but you can see in the Eryk drawing that his shirt has a more natural curvature like a dress shirt would because of the side "notches".
These will obviously be covered by the jacket in the final product, but - for now - making a small notch on either side:
... and then sanding it toward the front will give the shirt the more realistic curves.
That pic above also gives a good idea of the now flattened chest area on which I'll be sculpting Eryk's chest.
So... final sanding and, voila... the modified base torso that now I can start building back up:
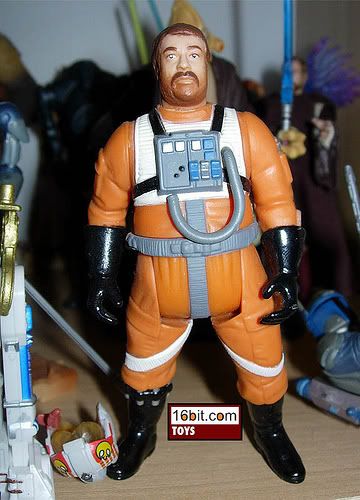
![[Wink]](wink.gif) :
:![[Big Grin]](biggrin.gif)
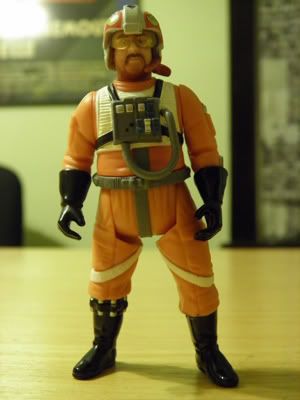
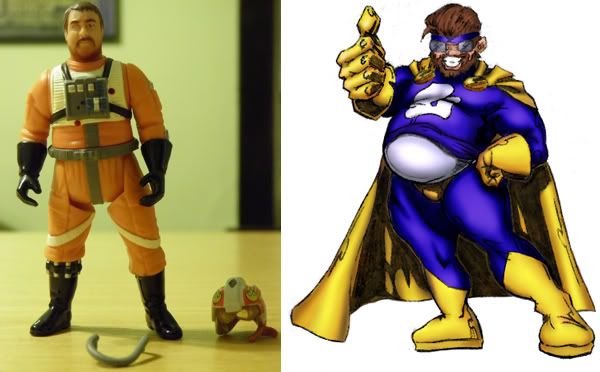
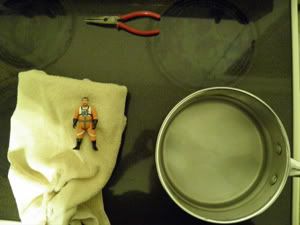
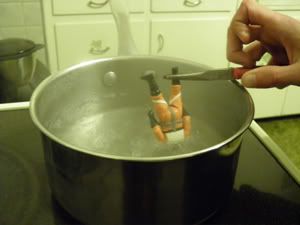
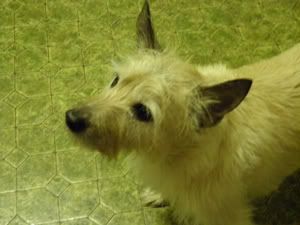
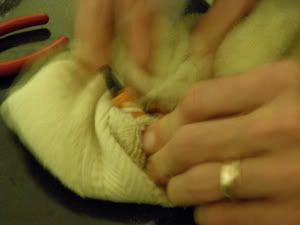
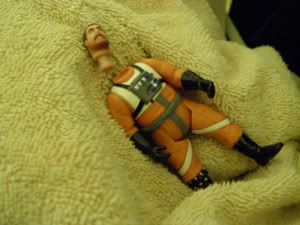
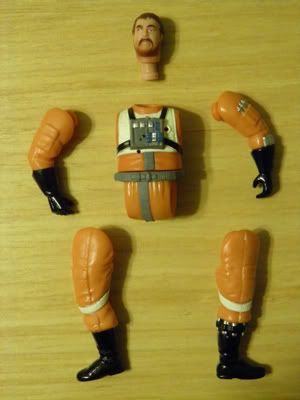
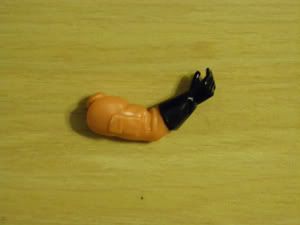
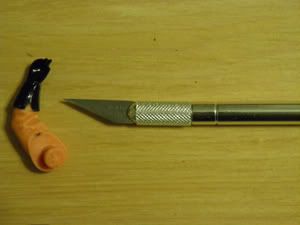

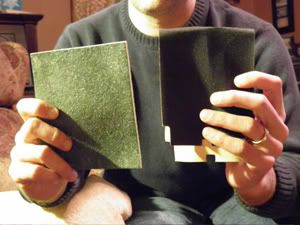
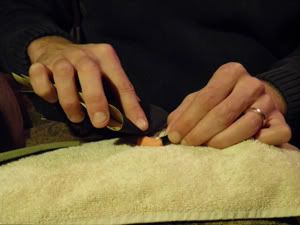
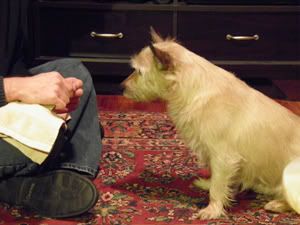
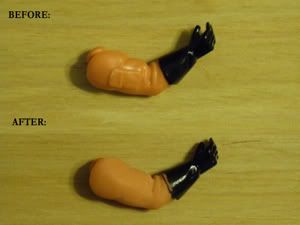
![[shrug]](graemlins/shrug.gif)
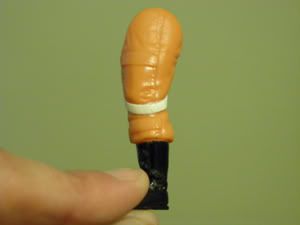
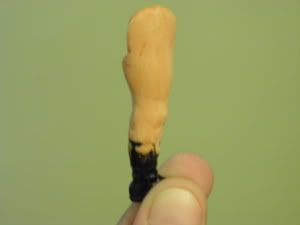
![[LOL]](graemlins/lol.gif)
![[Smile]](smile.gif)
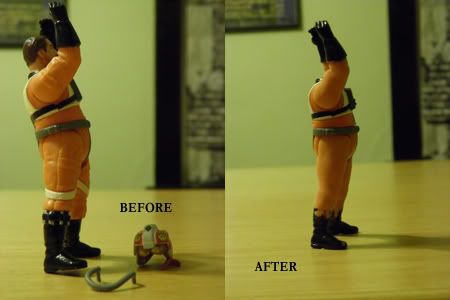
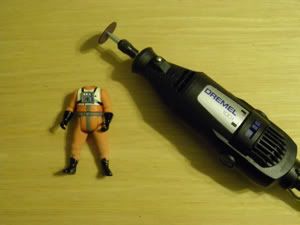
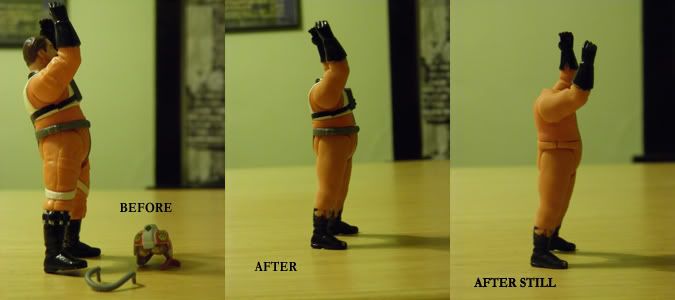
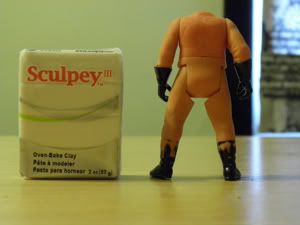
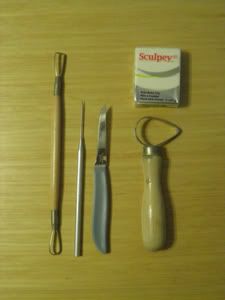
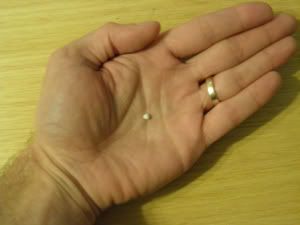
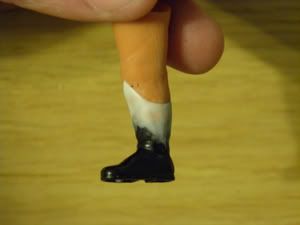
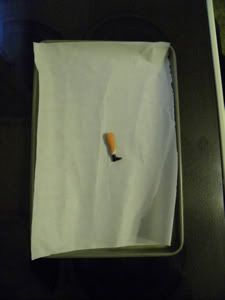
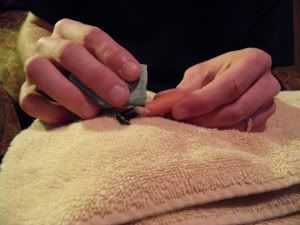
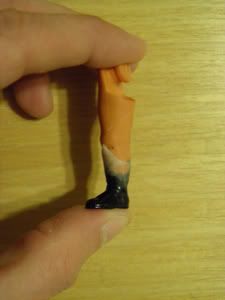

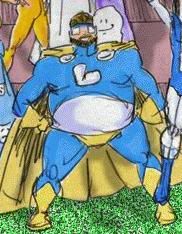
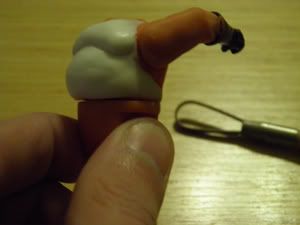
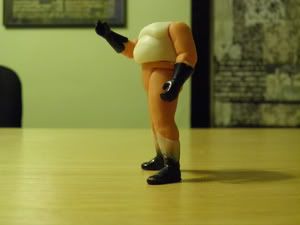
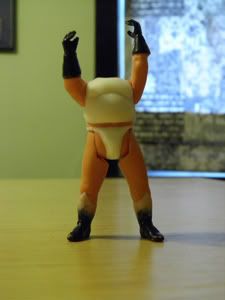
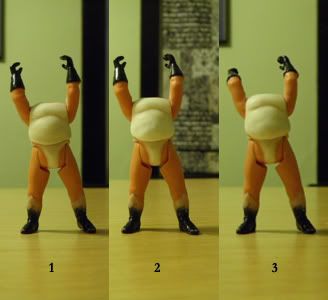
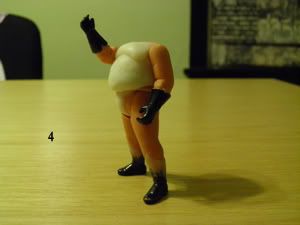
![[Yes]](graemlins/nod.gif)
![[Hug]](graemlins/hug.gif)

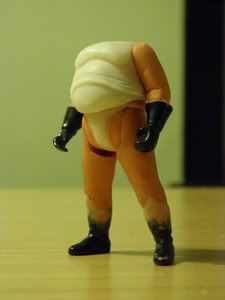
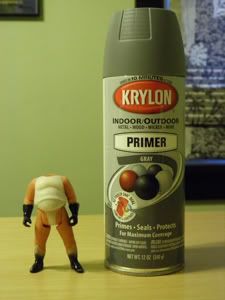
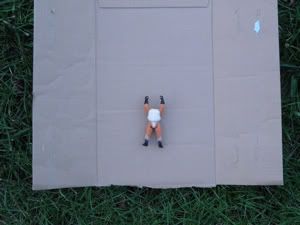
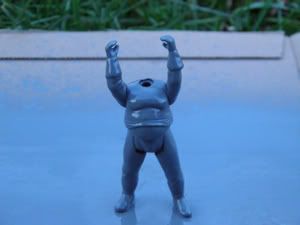
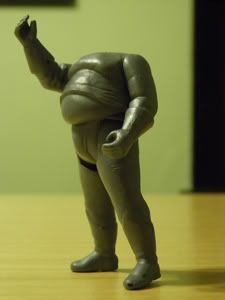
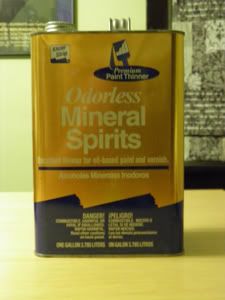
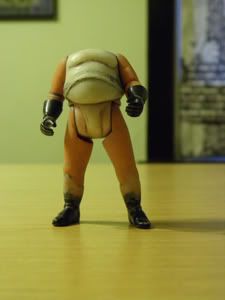
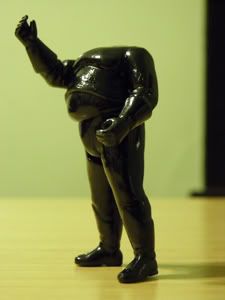
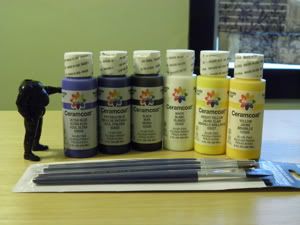
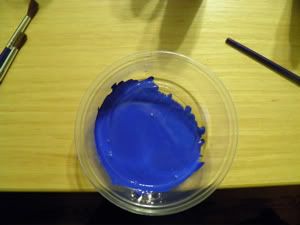
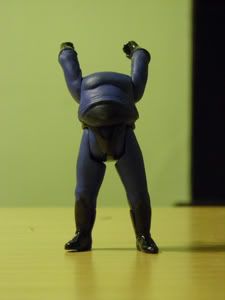
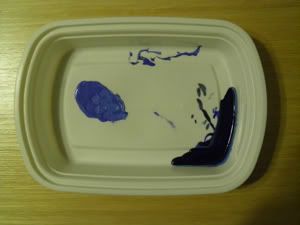
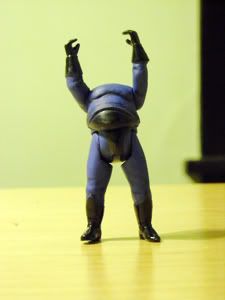
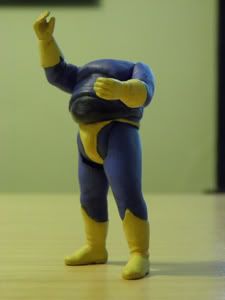
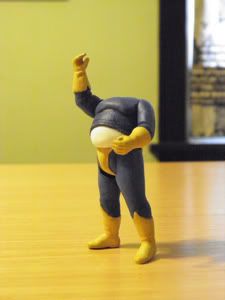
![[Cool]](cool.gif)
![[Poke Joke]](graemlins/poke.gif)
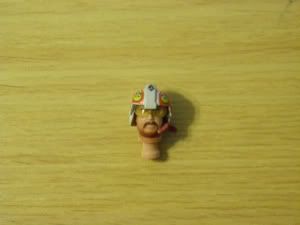
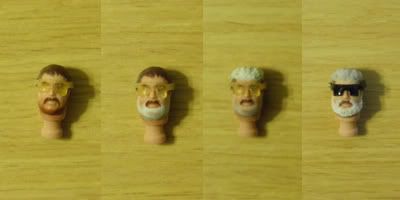
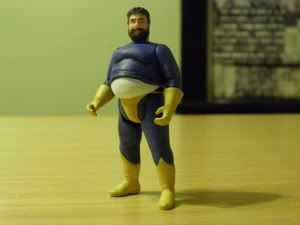
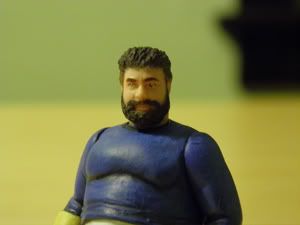
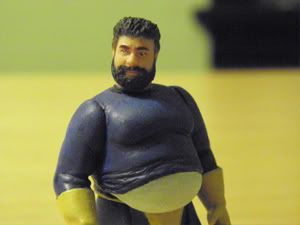
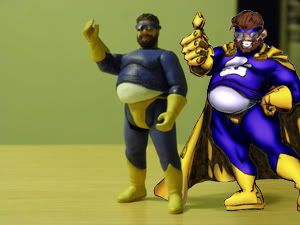
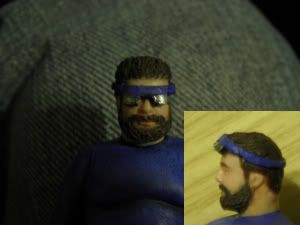
![[Hmmm?]](graemlins/hmmm.gif)
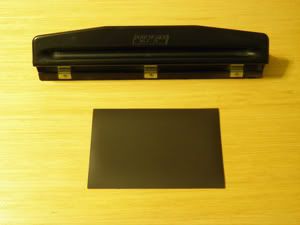
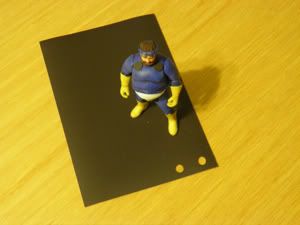
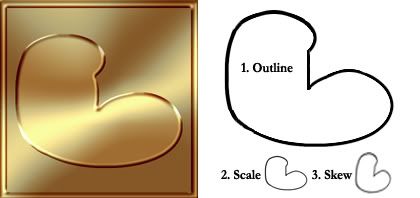
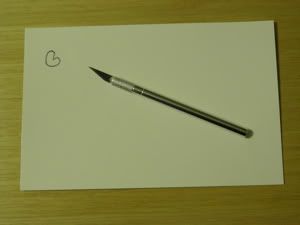
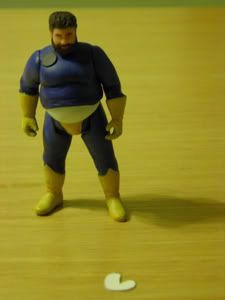
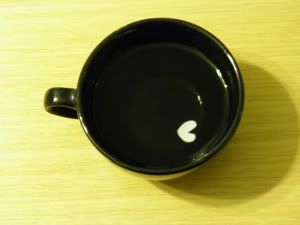
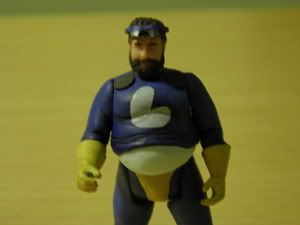
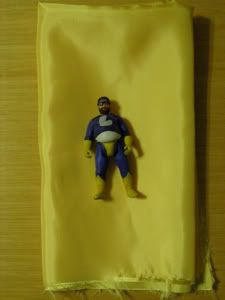
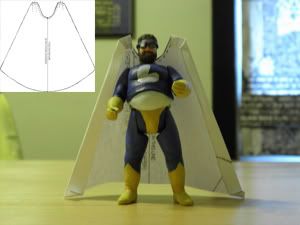
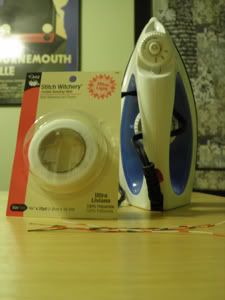

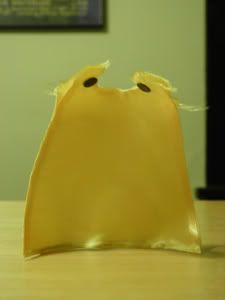
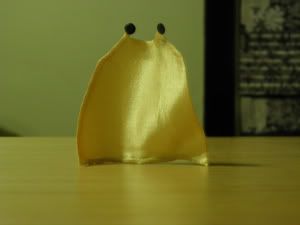
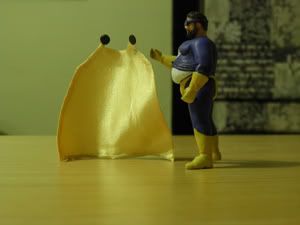
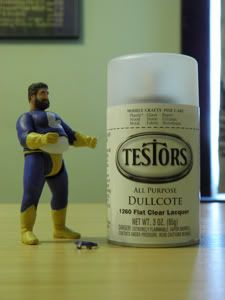
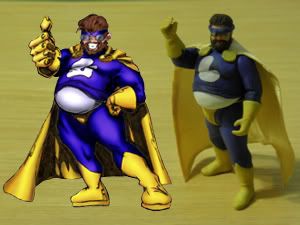
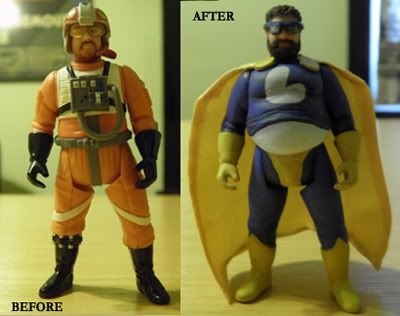
![[Love]](graemlins/love.gif)
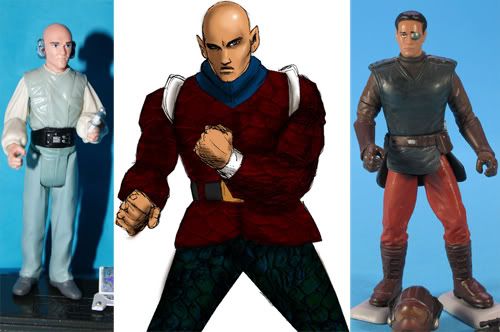
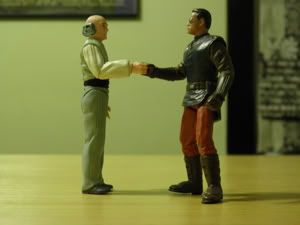
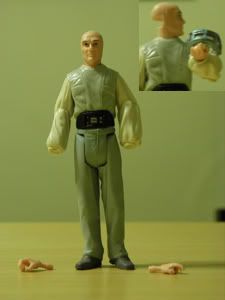
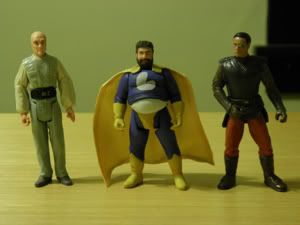
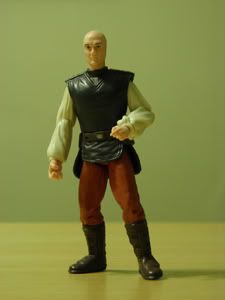
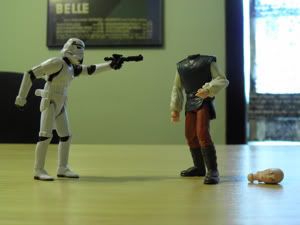
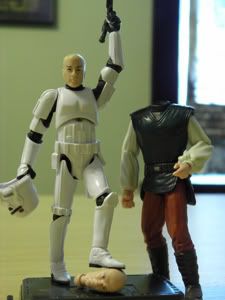
![[No]](graemlins/shake.gif)
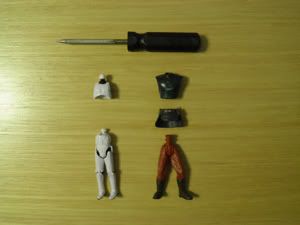
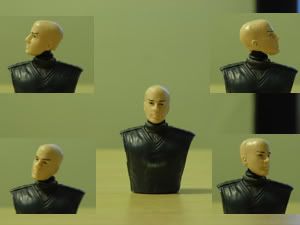

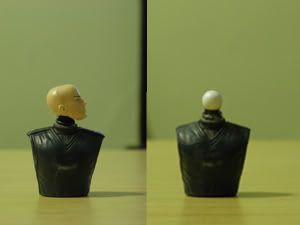
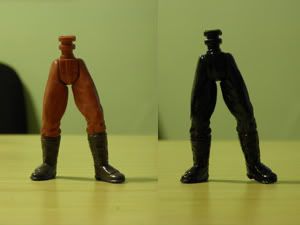
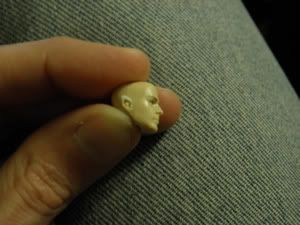
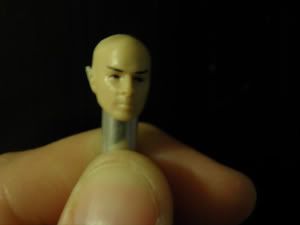
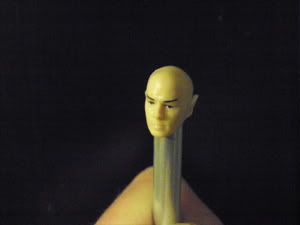
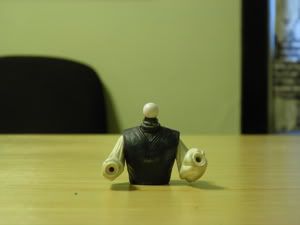
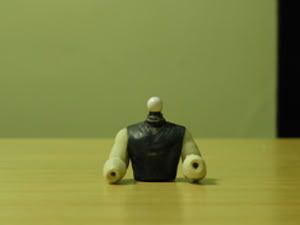
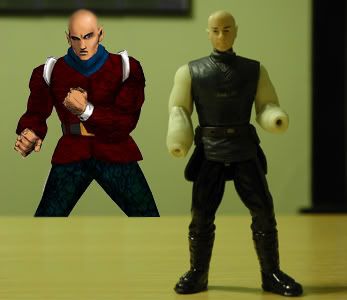
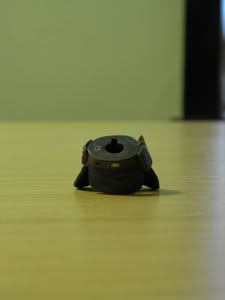
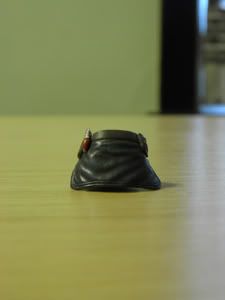
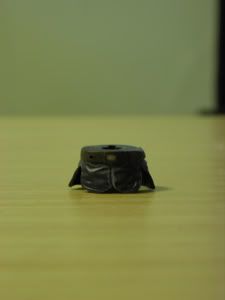
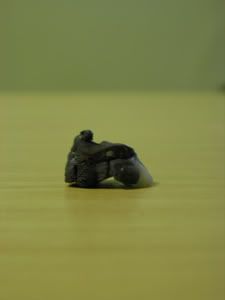
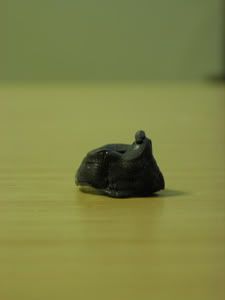
![[Roll Eyes]](rolleyes.gif)
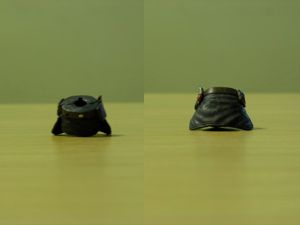

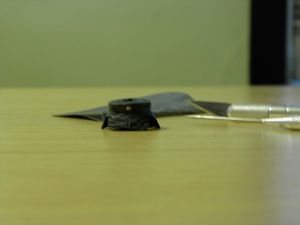
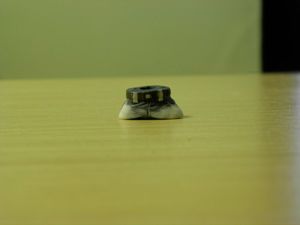

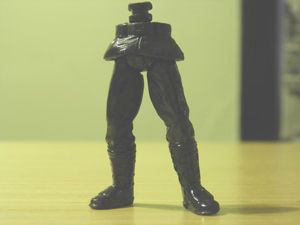
![[ROTFLMAO]](graemlins/rotflmao.gif)
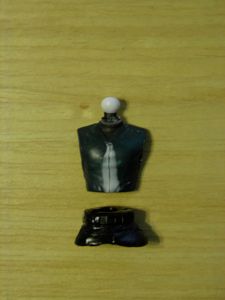
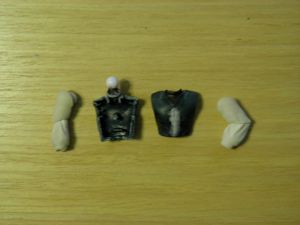
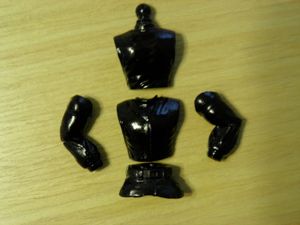

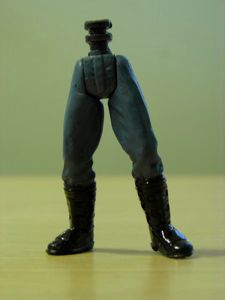
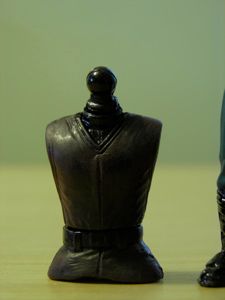

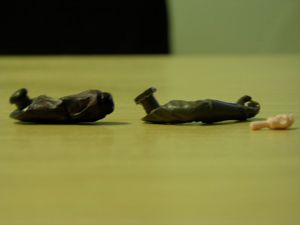
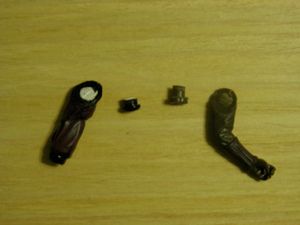

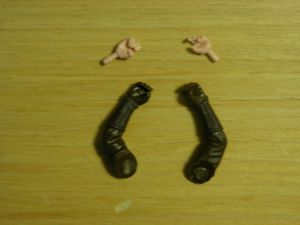
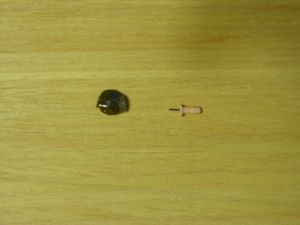
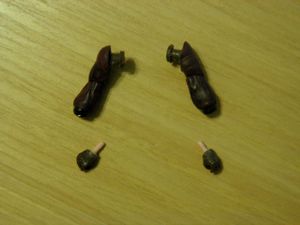
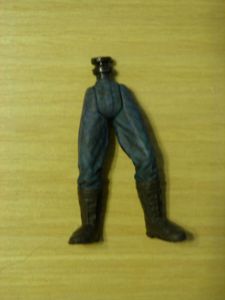
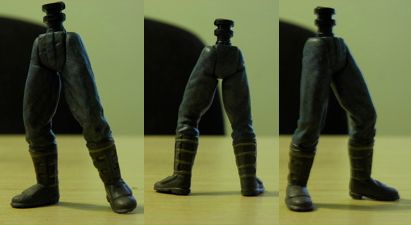
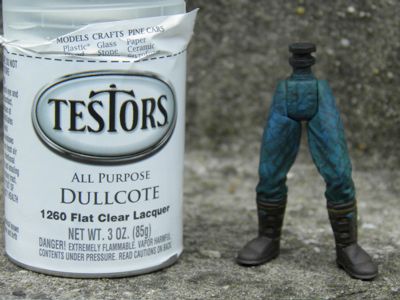
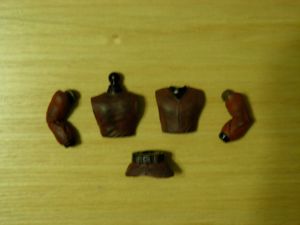
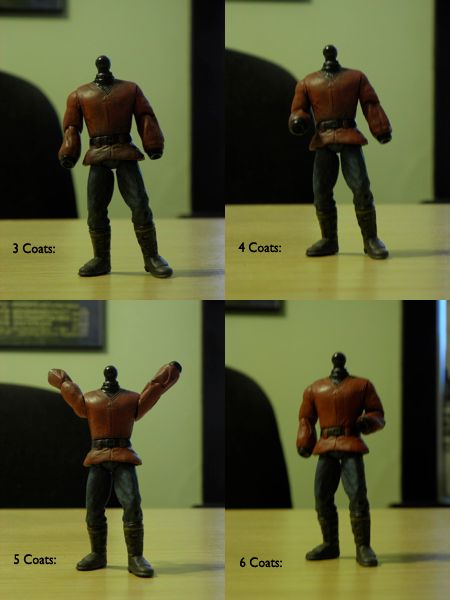
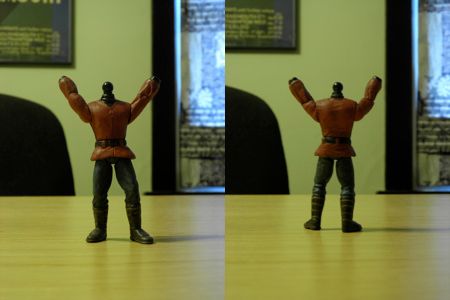
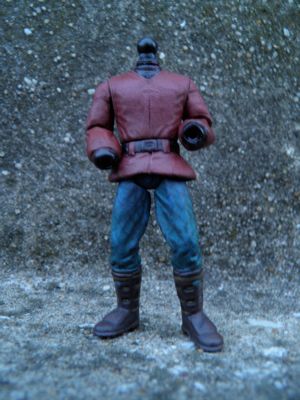
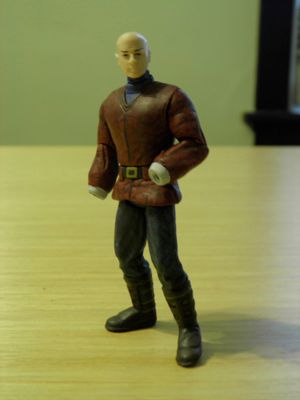
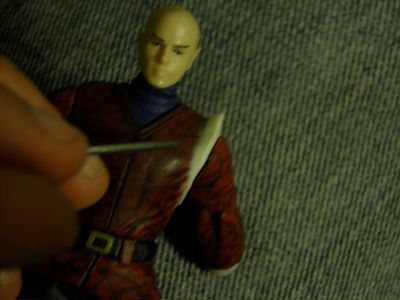
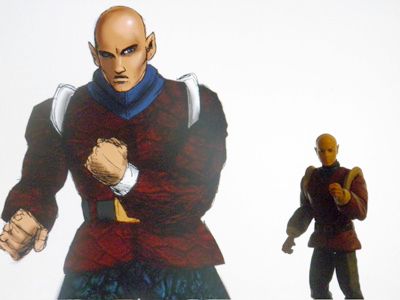
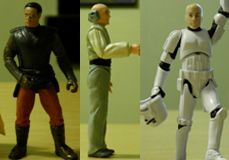
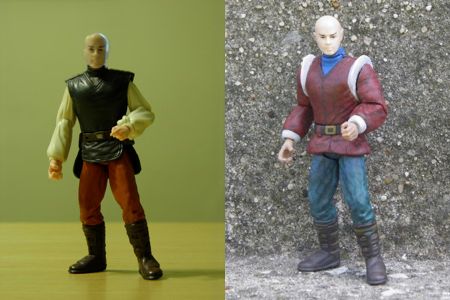
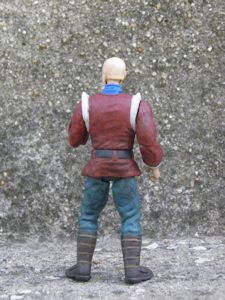
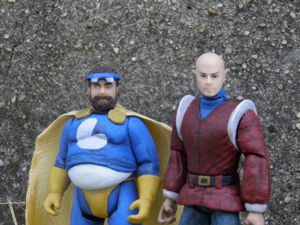
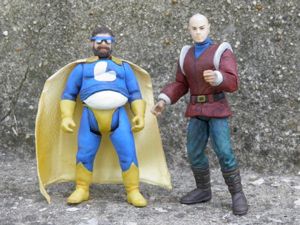
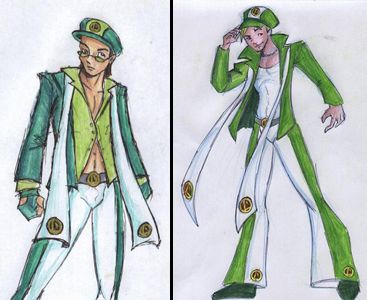
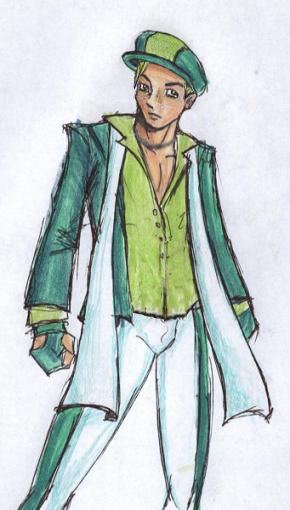
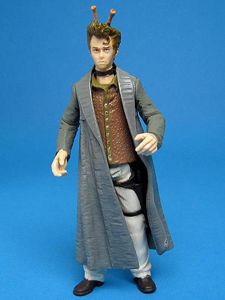

![[Poverty Lad]](graemlins/PovertyLad.gif)